 Honda Accord: Trunk Lid Torsion Bar Replacement
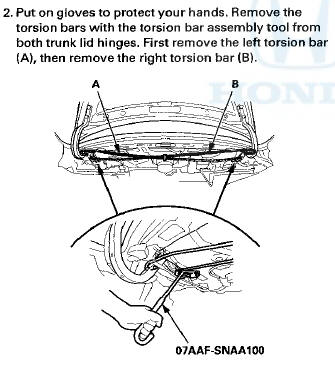
Special Tools Required
Torsion Bar Assembly Tool 07AAF-SNAA100
1. Remove the trunk lid torsion bars (A) from the torsion bar center clip (B).
3. Remove the torsion bar center clip (A) from the body.
4. Install the torsion bars In the reverse order of removal, and note these Items: - The shapes of the right torsion bar (A) and the left torsion bar (B) are shown. Install the torsion bars properly.
- Adjust the torsion bars forward or rearward with the torsion bar assembly tool.
- The torsion bars were Installed at the factory in the normal position as shown.
- Make sure the trunk lid opens properly and locks securely.
 Trunk Lid Adjustment
1. Remove the rear shelf (see page 20-128).
2. Pry up the notches (A) to release the rear hooks (B), and pull up the cap (C)
to release the side hooks (D), then remove
the cap.
3. Slightly lo ...
 Trunk Lid Weatherstrip Replacement
NOTE: 4-door Is shown; 2-door Is similar.
1. Remove the trunk lid weatherstrip (A) by pulling it off.
2. Locate the painted alignment mark (B or C) on the
trunk lid weatherstrip. Align the pain ...
See also:
Alternator Control Circuit
Troubleshooting
NOTE: Do this troubleshooting if, in step 5 of the
alternator and regulator circuit troubleshooting (see
page 4-27), the battery voltage is less than 13.5 V.
* 1. Connect the Honda Diagnostic Sys ...
Tire and Loading Information Label
The label attached to the driver’s doorjamb provides necessary tire and
loading
information.
The tire and loading information label attached to the
driver’s doorjamb contains:
1 The numb ...