 Honda Accord: Transmission Range Switch
Replacement
Honda Accord: Transmission Range Switch
Replacement
1. Raise the vehicle on a lift, or apply the parking brake, block the rear wheels, and raise the front of the vehicle. Make sure it is securely supported.
2. Remove the left front wheel.
3. Move the shift lever to N.
4. Remove the transmission range switch cover.
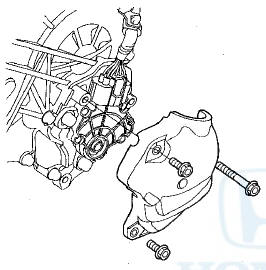
5. Disconnect the transmission range switch connector.
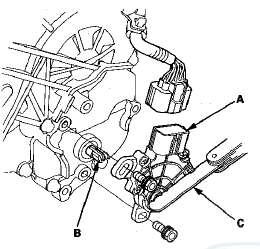
6. Remove the transmission range switch.
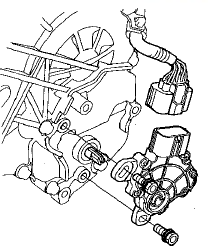
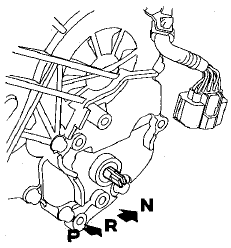
7. Make sure the selector control shaft is in the N position. If necessary, move the shift lever from P to N.
NOTE: Do not use the selector control shaft to adjust the shift position. If the selector control shaft tips are squeezed together it will cause a faulty signal or position due to play between the selector control shaft and the transmission range switch.
8. Set a new transmission range switch (A) to the N position. Align the cutouts (B) on the rotary-frame with the neutral positioning cutouts (C) on the transmission range switch. Then put a 2.0 mm (0.08 in) feeler gauge blade (D) in the cutouts to hold the transmission range switch in the N position.
NOTE: Be sure to use a 2.0 mm (0.08 in) blade or equivalent to hold the transmission range switch in the N position.
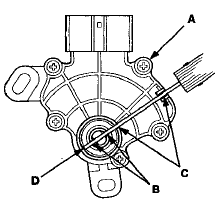
9. Install the transmission range switch (A) gently on the selector control shaft (B) while holding it in the N position with the 2.0 mm (0.08 in) blade (C).
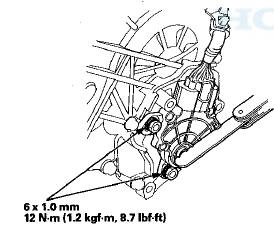
10. Tighten the bolts on the transmission range switch while you continue to hold the N position. Do not move the transmission range switch when tightening the bolts. Then remove the blade.
11. Check the connector for rust, dirt, or oil, and clean or repair if necessary. Then connect the transmission range switch connector securely.
12. Turn the ignition switch to ON (II). Move the shift lever through all positions, and verify the transmission range switch match with the A/T gear position indicator.
13. Check that the engine will start with the shift lever in P and N, and will not start in any other shift lever position.
14. Check that the back-up lights come on when the shift lever is in R.
15. Allow the front wheels to rotate freely, then start the engine, and check the shift lever operation.
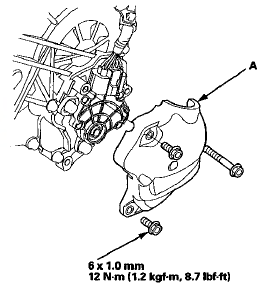
16. Install the transmission range switch cover (A).
17. Install the left front wheel.
 Transmission Range Switch Test
1. Raise the vehicle on a lift, or apply the parking brake,
block the rear wheels, and raise the front of the
. vehicle. Make sure it is securely supported.
2. Remove the left front wheel.
3. ...
 A/T Gear Position Indicator Panel Light
Harness Replacement
A/T Gear Position Indicator Panel Light
Harness Replacement
Type A Shift Lever
NOTE: The A/T gear position indicator panel light
harness and the park pin switch are not available
separately. Replace the A/T gear position indicator panel
light harness and t ...
See also:
Front Individual Map Light
Test/Replacement
With moonroof
1. Turn the map light switch OFF.
2. Carefully pry the lens ( A ) off with a small screwdriver.
Individual Map Light: 8 W x 2
3 . Remove the screws, then remove the individual ma ...
Accessories
Your dealer has Honda accessories
that allow you to personalize your
vehicle. These accessories have
been designed and approved for your
vehicle, and are covered by warranty.
Although non-Hon ...
Adjusting the Steering Wheel
The steering wheel height and distance from your body can be adjusted so that
you
can comfortably grip the steering wheel in an appropriate driving posture.
1. Pull the steering wheel adjustmen ...