 Honda Accord: Front Individual Map Light
Test/Replacement
Honda Accord: Front Individual Map Light
Test/Replacement
With moonroof
1. Turn the map light switch OFF.
2. Carefully pry the lens ( A ) off with a small screwdriver.
Individual Map Light: 8 W x 2
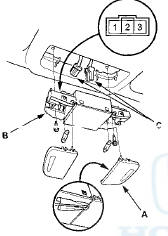
3 . Remove the screws, then remove the individual map lights (B).
4. Disconnect the connectors (C) f r om the map lights.
5. Check for continuity between the terminals in each switch position according to the table.
6. If the continuity is not as specified, check the bulb(s). If the bulb(s) are OK, replace the map light.
7. Install the light in the reverse order of removal.
Without moonroof
1. Turn the map light switch OFF.
2. Carefully pry the lens (A) off with a small screwdriver.
Individual Map Light: 8 W x 2
3 . Remove the screws, then remove the individual map lights (B).
4. Disconnect the connector (C) f r om the map lights.
5. Check for continuity between the terminals.
• There should be continuity between terminals No. 1 and No. 2 with the switch in the ON position.
• There should be no continuity between terminals No. 1 and No. 2 with the switch in the OFF position.
6. If the continuity is not as specified, check the bulb. If the bulb is OK, replace the map light.
7. Install the light in the reverse order of removal.
 Circuit Diagram
...
 Ceiling Light Test/Replacement
1. Turn the celling light switch OFF.
2. Carefully pry the lens (A) off with a small screwdriver.
2. Carefully pry the lens (A) off with a small screwdriver.
Celling Light 8 W
3. Remove the ...
See also:
Front Grille Cover Replacement
2-door
NOTE:
- Take care not to scratch the front grille or the body.
- When prying with a flat-tip screwdriver, wrap it with
protective tape to prevent damage.
1. Remove the front grille cov ...
VTEC Rocker Arm Test
Special Tools Required
. VTEC Air Stopper 07ZAJ-PNAA200
. VTEC Air Adapter 07ZAJ-PNAA101 (2)
. Air Joint Adapter 07ZAJ-PNAA300
- Air Pressure Regulator 07AAJ-PNAA101
1. Start the engine, and let ...
Bulb Replacement
Headlight (High'Beam)
1. Disconnect the 2P connector (A) from the headlight
Headlight (High Beam): 60 W
2. Turn the bulb socket 45 В° counterclockwise to remove
the bulb.
3. Install a new b ...