 Honda Accord: Throttle Body Removal/Installation
Do not insert your fingers into the installed throttle body when you turn the ignition switch to ON (II) or while the ignition switch is in ON (II). If you do, you will seriously injure your fingers if the throttle valve is activated.
NOTE: If you are replacing or cleaning the throttle body, start at step 1. If you are removing the throttle body, start at step 4.
1. Connect the HDS to the DLC while the engine is stopped.
2. Select the INSPECTION MENU on the HDS.
3. Do the TP POSITION CHECK in the ETCS TEST.
4. Turn the ignition switch to LOCK (0).
5. Remove the intake air duct (A).
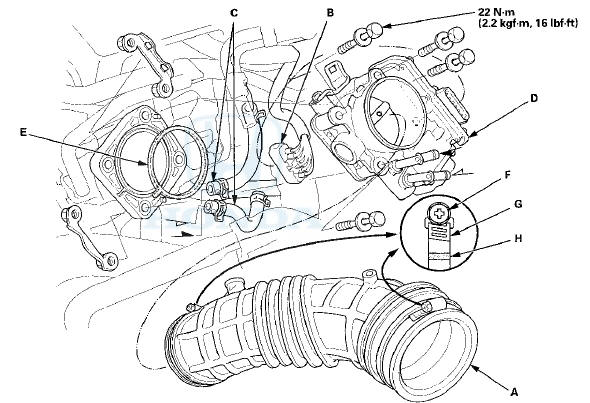
6. Disconnect the throttle body connector (B).
7. Disconnect and plug the water bypass hoses (C).
8. Remove the throttle body (D).
9. Install the parts in the reverse order of removal with a new gasket (E).
NOTE: When torqueing the screw of the hose band (F), align the edge of the hose band (G) with the mark (H) painted on the hose band.
After installing the throttle body, do these items: - Refill the radiator with engine coolant (see page 10-6).
- Do the ECM/PCM idle learn procedure (see page 11-293).
 Intake Air Resonator
Removal / Installation
Intake Air Resonator
Removal / Installation
1. Do the battery removal procedure (see page 22-92).
2. Remove the air cleaner (see page 11-332).
3. Remove the battery base (A)
4. Remove the front grille cover.
- 2-door (see page 2 ...

See also:
Front Seat Frame Replacement
Driver's Seat
Special Tools Required
KTC Trim Tool Set SOJATP2014*
*Available through the Honda Tool and
Equipment
Program; call 888-424-6857
SRS components are located in this area. Review the
SRS component ...
Paint Code
...
System Description
SRS Components
Airbags
The SRS is a safety device which, when used with the seat belt, is designed
to help protect the driver and front
passenger in a frontal impact exceeding a certain set limit ...