
 Honda Accord: Steering Lock Replacement
1. Remove the steering column (see page 17-10).
2. Center-punch both of the two shear bolts, and drill their heads off with a 5 mm (0.20 in) drill bit. Be careful not to damage the steering lock when removing the shear bolts.
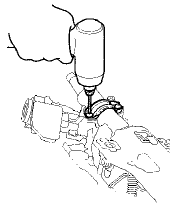
3. Remove the shear bolts from the steering lock, then remove the steering lock.
4. Remove the immobilizer-keyless control unit from the steering lock, then install it on the new steering lock (see page 22-440)..
5. Install the steering lock without the key inserted.
6. Loosely tighten the new shear bolts.
7. Insert the ignition key, and check for proper operation of the steering wheel lock and that the ignition key turns freely.
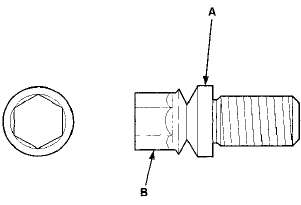
8. Tighten the shear bolts (A) until the hex heads (B) twist off.
9. Install the steering column (see page 17-12).
10. Rewrite all new keys to the immobilizer-keyless control unit (see page 22-439), and make sure the immobilizer system works properly.
 Steering Column Inspection
Inspection
1. Remove the steering column (see page 17-10).
2. Check these items;
•Check for loose bearing mounting nuts (A).
If they are loose, replace the column as an assembly.
-Check ...
 Rack Guide Adjustment
Special Tools Required
Locknut Wrench, 40 mm 07MAA-SL00100 or Locknut
Wrench, 41 mm 07916-SA50001
1. Set the front wheels in the straight ahead position.
2. Loosen the rack guide screw locknut ( ...
See also:
Fuel Fill Door Adjustment
1. Slightly loosen the hinge mounting bolts (A).
2 . Adjust the fuel fill door (B) in or out until it is flush with
the body, and up or down as necessary to equalize the
gaps.
3. Tighten the h ...
Front Passenger's Weight Sensor Output Check After
a Vehicle Collision
1. Position the front passenger's seat to the rear most
position, and adjust the seat-back to the forward most
position. Do not move the seat from this position.
2. Drive the vehicle, accelerate ...
Warm Up TWC Removal/Installation
1. Raise the vehicle on a lift.
2. Remove the secondary H02S (Sensor 2) (see page
11-197).
3. Remove the bolts (A).
4. Remove the WU-TWC bracket (B).
5. Lower the vehicle.
6. Remove th ...