 Honda Accord: Trunk Pass-through Lid Lock Cylinder
Replacement
Honda Accord: Trunk Pass-through Lid Lock Cylinder
Replacement
Special Tools Required
KTC Trim Tool Set SOJATP2014*
*Available through the Honda Tool and Equipment Program; call 888-424-6857
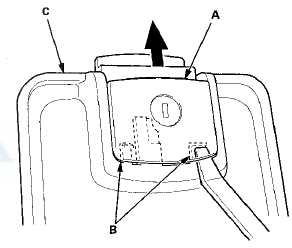
4-door
NOTE: - Take care not to scratch the trunk pass-through lid.
- Use the appropriate tool from the KTC trim tool set to avoid damage when removing components.
1. Pry up the handle (A) with the appropriate trim tool at both hook areas (B) on the forward side of the trunk pass-through lid (C). Then slide the handle half-way up.
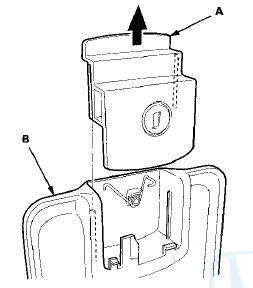
2. Remove the handle (A) from the trunk pass-through lid (B) by sliding it up.
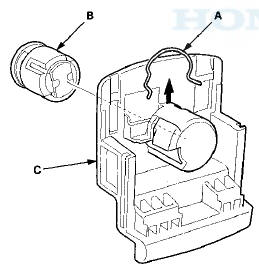
3. Remove the retainer clip (A), then remove the trunk pass-through lid lock cylinder (B) from the handle (C).
4. Install the lock cylinder in the reverse order of removal, and note these items: - Install the retainer clip on the handle, then install the lock cylinder. Be sure the clip is fully seated in the slot on the lock cylinder.
- Make sure the trunk pass-through lid opens properly and locks securely.
 Rear Seat Armrest Replacement
Special Tools Required
KTC Trim Tool Set SOJATP2014*
*Available through the Honda Tool and
Equipment
Program; call 888-424-6857
4-door
NOTE:
- Use the appropriate tool from the KTC trim tool s ...
 Trunk Pass-through Lid Replacement
4-door
NOTE: Take care not to tear or damage the seat covers.
1. Fold down the rear seat-back.
2. Remove the screws, and release the hooks (A), then
remove the trunk pass-through lid (B).
3 ...
See also:
PIN Number
You can add, change, or remove a
PIN number from any phonebook.
To add a PIN:
If you have selected a phonebook
without a PIN, you will see the above
display.
Enter the new 4-digit PIN. You ...
Circuit Diagram
...
Removing Discs from the Changer
To remove the disc that is currently
playing, press the eject button. You
will see ‘‘EJECT’’ in the center
display. When you remove the disc
from the slot, the system
automatically e ...