 Honda Accord: Starter Performance Test
1. Remove the starter (see page 4-11).
2. Firmly clamp the starter in a vise.
3. Make a connection for this test using the thickest (gauge) wire possible (preferably the same gauge as used on the vehicle).
NOTE: To avoid damaging the starter, never leave the battery connected for more than 5 seconds.
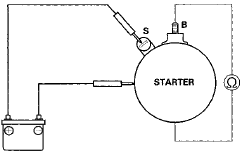
4. Connect the battery as shown, and check for continuity between the B terminal and the starter body. If there is continuity, it is working properly.
5. Disconnect the battery from the body, and check for continuity between the B terminal and the starter body. If there is no continuity, it is working properly.
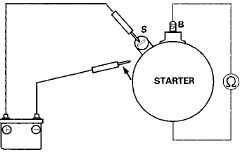
6. Connect the starter to the battery as shown, and confirm that the motor runs.
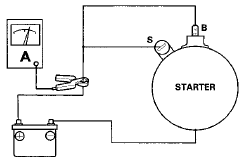
7. If the electric current meets the specification when the battery voltage is at 11.5 V, the starter is working properly.
Specification
Electric Current: 80 A or less
 Clutch Interlock Switch
Replacement
Clutch Interlock Switch
Replacement
M/T model
1, Disconnect the clutch interlock switch connector (A).
2. Loosen the locknut (B), then remove the clutch
interlock switch (C).
3. Install the clutch interlock switch, and adjust th ...
 Starter Removal and
Installation
Starter Removal and
Installation
Removal
1 Do the battery removal procedure (see page 22-92).
2. Remove the intake manifold (see page 9-4).
3. Disconnect the positive starter cable (A) from the B
terminal, and the S terminal ...
See also:
Selector Centre! Sheft Bearing
Replacement
Special Tools Required
•Driver Handle, 15 x 135L 07749-0010000
-Attachment, 22 x 24 mm 07746-001A800
1. Remove the oil seal from the end cover, then remove
the bearing.
2. Install a new be ...
Inspection and Maintenance
For your safety, perform all listed inspections and maintenance to keep your
vehicle
in good condition. If you become aware of any abnormality (noise, smell,
insufficient
brake fluid, oil resi ...
Starting the Engine
1. Apply the parking brake.
2. In cold weather, turn off all
electrical accessories to reduce
the drain on the battery.
3. Manual transmission:
Press the clutch pedal down all the
way. The ST ...