 Honda Accord: Starter Removal and
Installation
Honda Accord: Starter Removal and
Installation
Removal
1 Do the battery removal procedure (see page 22-92).
2. Remove the intake manifold (see page 9-4).
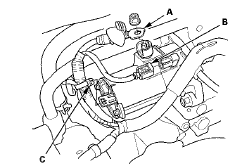
3. Disconnect the positive starter cable (A) from the B terminal, and the S terminal connector (B).
Installation
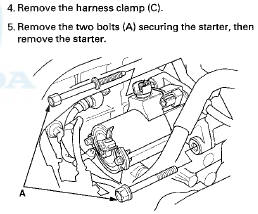
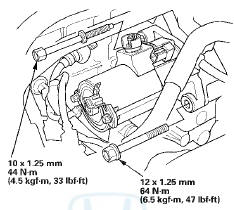
1. Install the starter, then tighten the two bolts.
2. Install the harness clamp (A).
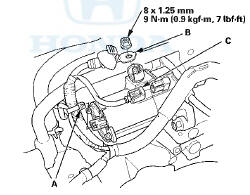
3. Connect the positive starter cable (B) to the B terminal, and the S terminal connector (C) Make sure the crimped side of the ring terminal faces away from the starter when you connect it.
4. Install the intake manifold (see page 9-6).
5. Do the battery installation procedure (see page 22-92).
6. Start the engine to make sure the starter works properly.
 Starter Performance Test
1. Remove the starter (see page 4-11).
2. Firmly clamp the starter in a vise.
3. Make a connection for this test using the thickest
(gauge) wire possible (preferably the same gauge as
used on ...
 Starter Overhaul
Disassembly/Reassembly
Armature Inspection and Test
1. Remove the starter (see page 4-11).
2. Disassemble the starter as shown in the Exploded
View.
3. Inspect the armature for wear or dama ...
See also:
Auxiliary Jack Assembly
Replacement
1. Remove the center console (see page 20-158).
2. Disconnect the 5P connector (A), and carefully pull out
the auxiliary jack assembly (B) from the center
console box.
3. Install the auxiliary ...
Paint Code
...
Rear Seat-back Cover Replacement
2-door
NOTE:
- Put on gloves to protect your hands.
- Take care not to tear or damage the seat covers.
1. Remove the seat-back (see page 20-239).
2. Remove all of the head restraints.
3. ...