 Honda Accord: Stabilizer Link Removal/Installation
1. Raise and support the vehicle (see page 1 -13).
2. Remove the rear wheel.
3. Remove the flange nut (A) and the self-locking nut (B) while holding the respective joint pin (C) with a hex wrench (D), then remove the stabilizer link (E).
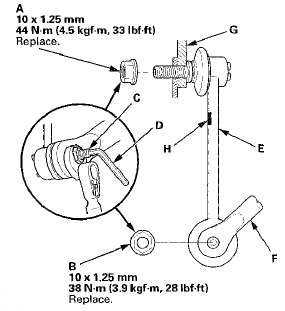
4. Install the stabilizer link on the stabilizer bar (F) and the knuckle adding in the brake hose bracket (G) with the joint pins set at the center of their range of movement.
NOTE: - The stabilizer link has a paint mark (H). The paint mark indicates the difference between the left and right stabilizer links.
- Install the end of the stabilizer link with the paint mark in the upper position.
5. Install the flange nut and the new self-locking nut, and tighten them to the specified torque while holding the respective joint pin with a hex wrench.
6. Clean the mating surfaces of the brake disc and the inside of the wheel, then install the rear wheel.
7. Test-drive the vehicle.
8. After 5 minutes of driving, tighten the self-locking nut again to the specified torque.
 Lower Arm B Replacement
1 Raise and support the vehicle (see page 1-13).
2. Remove the rear wheel.
3. Remove the lower arm B mounting bolts, then
remove lower arm B.
NOTE: Use new mounting bolts during reassembly.
...
 Stabilizer Bar Replacement
1. Raise and support the vehicle (see page 1-13).
2. Remove the rear wheels.
3. Disconnect both stabilizer links from the stabilizer bar
(see page 18-47).
4. Remove the flange bolts (A) and ...
See also:
Front Seat Slide Lever Replacement
Driver's seat (manual height adjustable
seat)/passenger's seat
NOTE:
- Put on gloves to protect your hands.
- Take care not to tear or damage the seat covers.
1. Remove the front seat {see pa ...
Playing XM® Radio
• To Play the XM® Radio
1. Select the XM® mode.
2. Press to switch to the
Audio menu screen.
3. Rotate to select XM Tune Mode,
then press .
4. Rotate to select Channel Mode
or C ...
Mainshaft Disassembly, Inspection,
and Reassembly
1. Inspect the thrust needle bearings and the needle bearings for galling and
rough movement
2. Inspect the splines for excessive wear and damage.
3. Check the shaft bearing surface for scorin ...