 Honda Accord: Reverse Idler Gear Removal and
Installation
Honda Accord: Reverse Idler Gear Removal and
Installation
Removal
1. Remove the bolt (A) securing the reverse idler gear shaft holder (B).
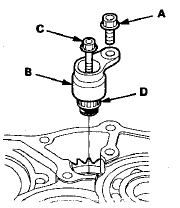
2. Install a 5 x 0.8 mm bolt (C) in the reverse idler gear shaft (D), and pull it to remove the reverse idler gear shaft and the reverse idler gear shaft holder together.
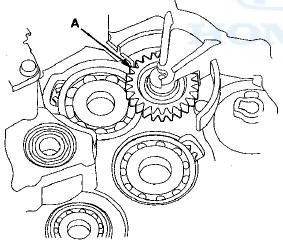
3. Remove the reverse idler gear (A).
Installation
1. Install the reverse idler gear in the transmission housing.
2. Lightly coat the reverse idler gear shaft (A), the needle bearing (B), and new O-rings (C) with lithium grease.
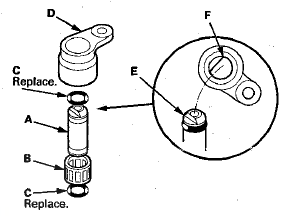
3. Assemble O-rings and the needle bearing on the reverse idler gear shaft, then install the reverse idler gear shaft in the reverse idler gear shaft holder (D).
Align the D-shaped cut out (E) of the reverse idler gear shaft with the D-shaped area (F) of the reverse idler gear shaft holder.
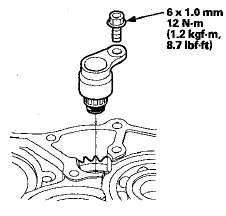
4. Install the reverse idler gear shaft/holder assembly on the transmission housing.
 Bearing Installation
Special Tools Required
-Attachment, 78 x 80 mm 07NAD-PX40100
-Driver Handle, 15 x 135L 07749-0010000
-Bearing Driver Attachment, 42 x 47 07746-0010300
1. Install the bearings in the direction show ...
 Valve Body
...
See also:
Automatic Climate Control Sensors
The automatic climate control system is
equipped with a sunlight sensor and an
interior temperature sensor. Do not cover or
spill any liquid on them.
...
Trunk Pass-through Lid Lock Cylinder
Replacement
Special Tools Required
KTC Trim Tool Set SOJATP2014*
*Available through the Honda Tool and
Equipment
Program; call 888-424-6857
4-door
NOTE:
- Take care not to scratch the trunk pass-through l ...
Accelerator Pedal Module
Removal/Installation
1. Disconnect the APP sensor connector (A).
2. Remove the accelerator pedal module (B).
NOTE: The APP sensor is not available separately. Do
not disassemble the accelerator pedal module.
3. ...