 Honda Accord: Bearing Removal
Special Tools Required
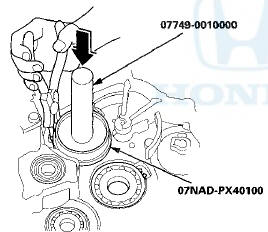
•Attachment, 78x80 mm 07NAD-PX40100
-Driver Handle, 15 x 135L 07749-0010000
-Bearing Driver Attachment, 42 x 47 07746-0010300
1. Remove the idler gear shaft (see page 14-297) when removing the mainshaft bearing and the idler gear shaft bearing.
NOTE: If you are only removing the countershaft bearing, the idler gear shaft removal is not needed.
2. To remove the mainshaft bearing and the countershaft bearing from the transmission housing, expand each snap ring using snap ring pliers, then drive the bearing out using the driver handle and the 78 x 80 mm attachment.
NOTE: Do not remove the snap ring i m i w ? ifc necessary to clean the grooves in the transmission housing.
3. To remove the secondary shaft bearing and the idler gear shaft bearing, expand each snap ring using snap ring pliers, then drive the bearing out using the driver handle and the 42 x 47 mm bearing driver attachment.
 Housing and Shaft Assembly Removal
Special Tools Required
Housing Puller 07HAC-PK40102
1. Remove the ATF feed pipe (A) from the idler gear shaft, and remove the ATF
lubrication pipe (B) from the
transmission housing.
2. Remove ...
 Bearing Installation
Special Tools Required
-Attachment, 78 x 80 mm 07NAD-PX40100
-Driver Handle, 15 x 135L 07749-0010000
-Bearing Driver Attachment, 42 x 47 07746-0010300
1. Install the bearings in the direction show ...
See also:
Braking System
Your vehicle is equipped with disc
brakes at all four wheels. A power
assist helps reduce the effort needed
on the brake pedal. The emergency
brake assist system increases the
stopping force ...
Towing Preparation
• Towing Load Limits
Your vehicle can tow a trailer if you carefully observe the load limits, use
the proper
equipment, and follow the towing guidelines. Check the load limits before
driving. ...