 Honda Accord: Housing and Shaft Assembly Removal
Special Tools Required
Housing Puller 07HAC-PK40102
1. Remove the ATF feed pipe (A) from the idler gear shaft, and remove the ATF lubrication pipe (B) from the transmission housing.
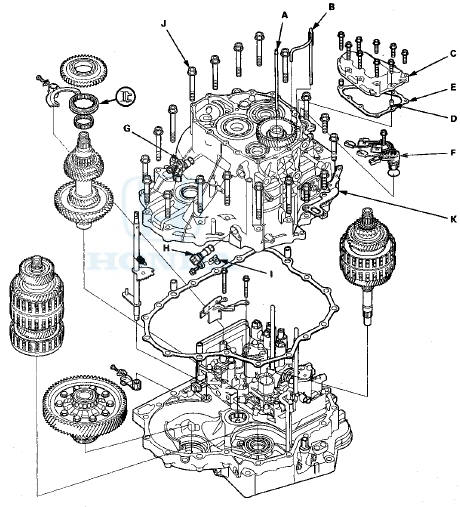
2. Remove the shift solenoid valve cover (C), the dowel pins (D), and the gasket (E).
3. Disconnect the connectors from the shift solenoid valves, and remove the shift solenoid wire harness (F) with the O-ring.
4. Remove the input shaft (mainshaft) speed sensor (G) with the O-ring, and remove the output shaft (countershaft) speed sensor (H) with the O-ring and the washer (I).
5. Remove the transmission housing mounting bolts (19 bolts) (J) and the transmission hanger (K).
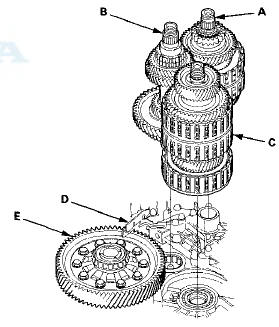
8, Align the spring pin (A) on the selector control shaft (B) with the transmission housing groove (C) by turning the selector control shaft with the selector control lever.
NOTE: Do not squeeze the end of the selector control shaft tips together when turning the selector control shaft.

7. Install the housing puller over the mainshaft, then remove the transmission housing.
8. Remove the countershaft reverse gear and the needle bearing.
9. Remove the lock bolt securing the reverse shift fork, then remove the reverse shift fork with the reverse selector together.
10. Remove the selector control lever from the selector control shaft.
11. Unlock the detent spring (A) from the detent arm (B).

12. Remove the selector control shaft (A) from the torque converter housing.
13. Turn the detent arm (B) away from the countershaft (C).
14. Remove the mainshaft subassembly (A), the countershaft subassembly (B), and the secondary shaft subassembly (C) together. Do not bump the countershaft on the baffle plate (D).
15. Remove the baffle plate.
16. Remove the differential assembly (E).

 Bearing Removal
Special Tools Required
•Attachment, 78x80 mm 07NAD-PX40100
-Driver Handle, 15 x 135L 07749-0010000
-Bearing Driver Attachment, 42 x 47 07746-0010300
1. Remove the idler gear shaft (see page 1 ...
See also:
Passenger's Air Mix Control Motor
Test
NOTE: Before testing the motor, check for HVAC DTCs
(see page 21-101).
1. Disconnect the 7P connector from the passenger's air
mix control motor.
Incorrectly applying power and ground to the
...
High-Mount Brake Light Bulbs
High-mount brake light bulbs are the LED type. Have an authorized Honda
dealer
inspect and replace the light bulbs. ...
F-CAN Circuit Troubleshooting
1. Turn the ignition switch to LOCK (0).
2. Jump the SCS line with the HDS.
3. Disconnect ECM/PCM connector A (49P).
4. Measure the resistance between ECM/PCM connector
terminals A3 and A4.
...