 Honda Accord: Secondary Shaft 2nd Gear Axial
Clearance Inspection
Honda Accord: Secondary Shaft 2nd Gear Axial
Clearance Inspection
1. Install the thrust needle bearing (A), the needle bearing (B), 2nd gear (C), the thrust needle bearing (D), the 37 x 58 mm thrust washer (E), and the 2nd clutch (F) on the secondary shaft (G), then secure them with the set ring ( H ) . Do not install the O-rings during inspection.
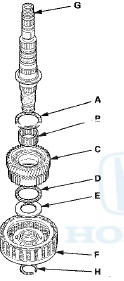
2. Measure the clearance between the set ring (A) and the 2nd clutch guide (B) using a feeler gauge (C), in at least three places. Use the average as the actual clearance.
Standard: 0.04-0.12 mm (0.002-0.005 in)
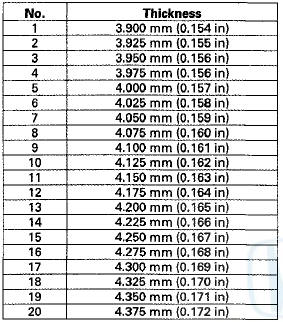
3. If the clearance is out of standard, remove the 37 x 58 mm thrust washer, and measure its thickness.
4. Select and install a new thrust washer, then recheck.
THRUST WASHER, 37 x 58 mm
5. After replacing the thrust washer, make sure the clearance is within standard.
6. Disassemble the installed parts from the secondary shaft.
 Secondary Shaft Idler Gear Removal
and Installation
Secondary Shaft Idler Gear Removal
and Installation
Special Tools Required
Attachment 42 mm I.D. 07QAD-P0A0100
Removal
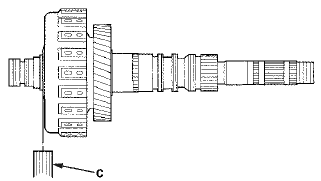
Place a spacer (A) on the secondary shaft (B), and set a
puller (C) under the idler gear (D), then remove the idler
gear.
Ins ...
 Secondary Shaft 1 st Gear Axial
Clearance Inspection
Secondary Shaft 1 st Gear Axial
Clearance Inspection
Special Tools Required
Attachment, 42 mm I.D. 07QAD-P0A0100
1. Remove the secondary shaft transmission housing
bearing (see page 14-270).
2. Install the thrust needle b e a r i n g (A), the need ...
See also:
To Use Maintenance MinderTM
• Displaying the Engine Oil Life
1. Turn the ignition switch to ON
.
2. Press the (Select/Reset) knob
repeatedly
until the engine oil life appears on the
information display.
The Maint ...
VSA® (Vehicle Stability Assist), aka ESC(Electronic Stability Control), System
VSA® helps to stabilize the vehicle during cornering if the vehicle turns
more or less
than what was intended. It also assists in maintaining traction on slippery
surfaces.
It does so by reg ...
Malfunction Indicator Lamp
If the indicator comes on
while driving, it means one
of the engine’s emissions control
systems may have a problem. Even
though you may feel no difference in
your vehicle’s performance ...