 Honda Accord: Rear Seat-back Cover Replacement
2-door
NOTE: - Put on gloves to protect your hands.
- Take care not to tear or damage the seat covers.
1. Remove the seat-back (see page 20-239).
2. Remove all of the head restraints.
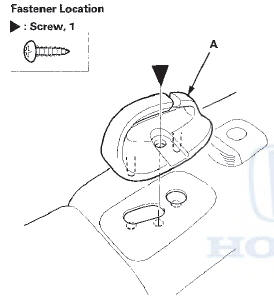
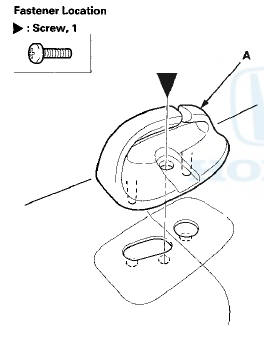
3. Remove the screw, then remove the center belt guide (A).
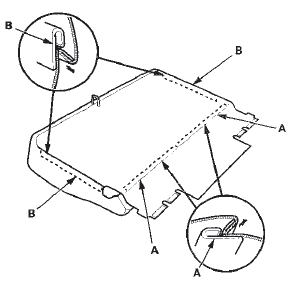
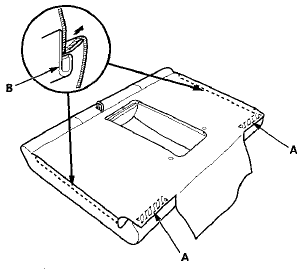
4. Release the lower hook strips (A) and the side hook strips (B).

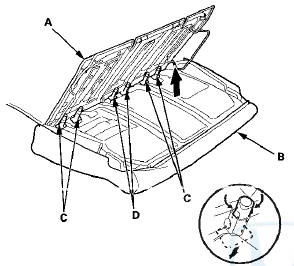
6. Pull out the seat-back frame (A) from the seat-back cover/pad (B), then remove the head restraint guides (C) and the center head restraint guides (D) while pinching the end of the guides.
7. Remove the seat-back cover/pad from the seat-back frame.
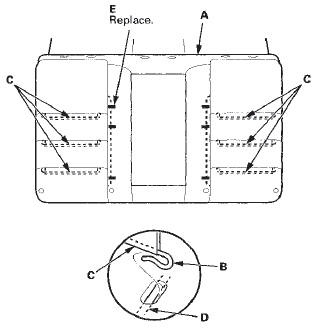
8. Pull back the edge of the seat-back cover (A) all the way around, and remove the upholstery rings (B).
Release the hooks (C) of the lateral wires (D) from the longitudinal wires (E) on the pad, and remove the remaining upholstery rings, then remove the seat-back cover.
NOTE: The seat-back cover except the leather seat-back cover is shown; the leather seat-back cover is similar.

9. Install the seat-back cover in the reverse order of removal, and note these items: - To prevent wrinkles when installing the seat-back cover, make sure the material is stretched evenly over the pad before securing the upholstery rings and the hook strips.
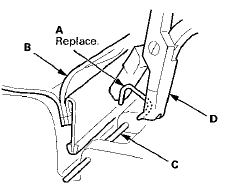
- Replace all of the upholstery rings (A) fastening the seat-back cover (B) to the pad wires (C) with new ones using commercially available upholstery ring pliers (D).
4-door
NOTE: - Put on gloves to protect your hands.
- Take care not to tear or damage the seat covers..
1. Remove the seat-back (see page 20-239).
2. Remove these items: - All of the head restraints - Armrest (see page 20-244) - Trunk pass-through lid (see page 20-247)
3. Remove the screw, then remove the center belt guide (A).
4. Release the lower Velcro fasteners (A) and the side hook strips (B).
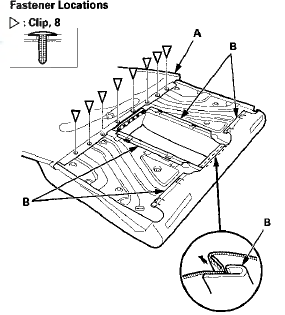
5. Turn over the seat-back cover (A), then release the hook strips (B), and remove the clips.
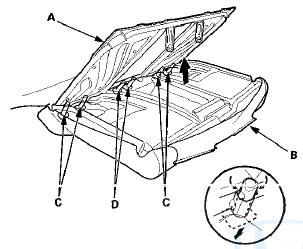
6. Pull out the seat-back frame (A) from the seat-back cover/pad (B), then remove the head restraint guides (C) and the center head restraint guides (D) while pinching the end of the guides.
7. Remove the seat-back cover/pad from the seat-back frame.
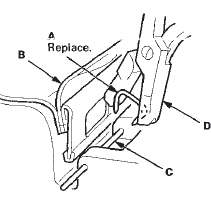
8. Pull back the edge of the seat-back cover (A) all the way around, and release the hooks (B) of the lateral wires (C) from the longitudinal wires (D) on the pad, and remove the upholstery rings (E), then remove the seat-back cover.
NOTE: The leather seat-back cover is shown; the other types of the seat-back covers are similar.
i. Install the seat-back cover in the reverse order of removal, and note these items: - If the clip is damaged or stress-whitened, replace it with a new one.
- Push the clips Into place securely.
- To prevent wrinkles when Installing the seat-back cover, make sure the material is stretched evenly over the pad before securing the upholstery rings and the hook strips.
- Replace all of the upholstery rings (A) fastening the seat-back cover (B) to the pad wires (C) with new ones using commercially available upholstery ring pliers (D).
 Rear Seat Armrest Beverage Holder
Replacement
Rear Seat Armrest Beverage Holder
Replacement
Special Tools Required
KTC Trim Tool Set SOJATP2014*
* Available through the Honda Tool and
Equipment
Program; call 888-424-6857
4-door
NOTE:
- Take care not to tear or damage the seat covers. ...
 Rear Seat Side Bolster Cover
Replacement
Rear Seat Side Bolster Cover
Replacement
4-door
NOTE: Take care not to tear or damage the seat covers.
1. Remove the seat side bolster (see page 20-242).
2. Release all the hook strips (A), fold back the seat side
bolster cover (B), ...
See also:
HFL Menus
The power mode must be in ACCESSORY or ON to use HFL.
• Phone Settings screen
1. Press the SETTINGS button.
2. Rotate to select Phone
Settings, then
press .
To use HFL, you must first pa ...
Shift Lever Removal
1. Remove the center console (see page 20-158).
2. Move the shift lever to R.
3. Remove the nut securing the shift cable end.
4. Unlock the retainer (A).
5. Rotate the socket holder retain ...
Cylinder Head
Component Location Index (cont'd)
Engine Compression Inspection
NOTE: After this inspection, you must reset the engine
control module (ECM)/powertrain control module
(PCM), otherwise the ECM ...