
 Honda Accord: Rear Power Window Motor Test
1. Remove the rear power window switch (see page 22-307).
2. Test the motor in each direction by connecting battery power and ground to the rear power window switch 14P connector (A) according to the table.
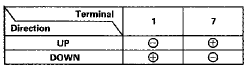
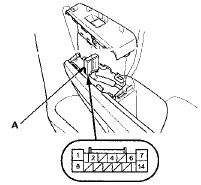
Wire side of female terminals
3. If the motor does not run or fails to run smoothly, go to step 4.
4. Remove the door panel (see page 20-38).
5. Disconnect the 2P connector (A) from the rear power window motor (B).
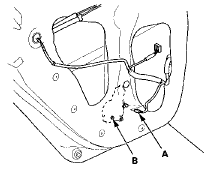
6. Check for continuity between the rear power window switch 14P connector terminals and rear power window motor 2P connector terminals as shown:.
There should be continuity.
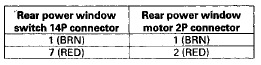
REAR POWER WINDOW MOTOR 2P CONNECTOR
Wire side of female terminals
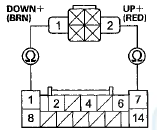
REAR POWER WINDOW SWITCH 14P CONNECTOR
Wire side of female terminals
7. If the wire harness is OK, replace the rear power window motor.
 Front Passenger's Power Window
Motor Test
Front Passenger's Power Window
Motor Test
With AUTO UP/AUTO DOWN function
Motor Test
1. Remove the front passenger's power window switch:
• 4-door (see page 22-306)
• 2-door (see page 22-307)
2. Test the motor in each direction ...
 Power Window Master Switch
Replacement
Power Window Master Switch
Replacement
4-door
1. Carefully remove the power window master switch
(A).
2. Disconnect the 37P connector (B) from the power
window master switch, and the 13P connector (C)
from the power mirror switch (D ...
See also:
Rear Seat-back Latch Replacement
NOTE:
- Take care not to bend or scratch the interior trim.
- 4-door is shown; 2-door is similar.
1. Remove the rear shelf (see page 20-128).
2. Disconnect the seat-back release cable (A) fr ...
AM/FM Antenna Amplifier
Replacement
1. Remove the C-pillar trim.
• 4-door (see page 20-110)
• 2-door (see page 20-110)
2. Disconnect the connectors (A) from the AM/FM
antenna amplifier (B).
4-Door
2-Door
3. Remove ...
DTC Troubleshooting
DTC indicator A: Climate Control Unit Internal
Error
NOTE: Check the battery condition (see page 22-90) and
the charging system (see page 4-25).
1. Turn the ignition switch to LOCK (0), and then ...