 Honda Accord: Front Passenger's Power Window
Motor Test
Honda Accord: Front Passenger's Power Window
Motor Test
With AUTO UP/AUTO DOWN function
Motor Test
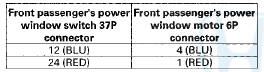
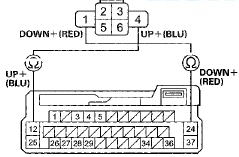
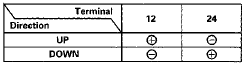
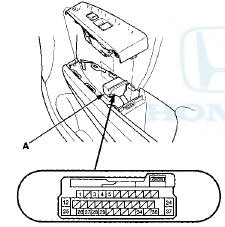
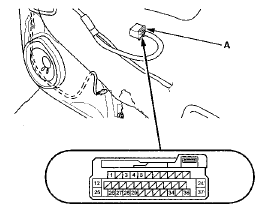
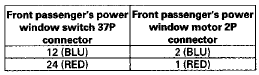
1. Remove the front passenger's power window switch: • 4-door (see page 22-306) • 2-door (see page 22-307) 2. Test the motor in each direction by connecting battery power and ground to the front passenger's power window switch 37P connector (A) according to the table.
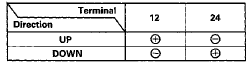
4-door
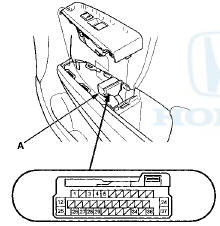
Wire side of female terminals
2-door
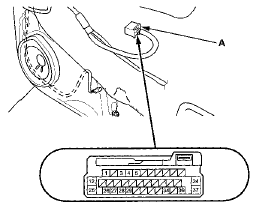
Wire side of female terminals
3. If the motor does not run or fails to run smoothly, go to step 4, if the motor runs smoothly, go to step 8.
4. For 4-door: remove the door panel (see page 20-17).
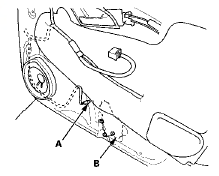
5. Disconnect the 6P connector (A) from the front passenger's power window motor (B).
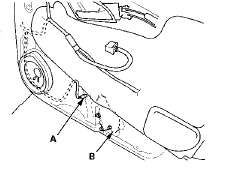
6. Check for continuity between the front passenger's power window switch 37P connector terminals and front passenger's power window motor 6P connector terminals as shown. There should be continuity.
FRONT PASSENGER'S POWER WINDOW MOTOR 6P CONNECTOR
Wire side of female terminals
FRONT PASSENGER'S POWER WINDOW SWITCH 37P CONNECTOR
Wire side of female terminals
7. If there is no continuity, repair an open or high resistance in the wire(s). If the wire harness is OK, replace the front passenger's power window motor.
Hall IC unit (Pulser) Test
So Do the front passenger's power window switch input test at terminals No. 26, No. 27, and No. 28 (see page 22-296).
Without AUTO UP/AUTO DOWN function
1. Remove the front passenger's power window switch.
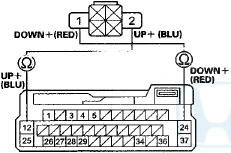
• 4-door (see page 22-306) • 2-door (see page 22-307) 2. Test the motor in each direction by connecting battery power and ground to the front passenger's power window switch 37P connector (A) according to the table.
4-door
Wire side of female terminals
2-door
Wire side of female terminals
3. If the motor does not run or fails to run smoothly, go to step 4.
4. For 4-door: remove the door panel (see page 20-17).
5. Disconnect the 2P connector (A) from the front passenger's power window motor (B).
6. Check for continuity between the front passenger's power window switch 37P connector terminals and front passenger's power window motor 2P connector terminals as shown. There should be continuity.
FRONT PASSENGER'S POWER WINDOW MOTOR 2P CONNECTOR
Wire side of female terminals
FRONT PASSENGER'S POWER WINDOW SWITCH 37P CONNECTOR
Wire side of female terminals
7. If the wire harness is OK, replace the front passenger's power window motor.
 Driver's Power Window Motor Test
Motor Test
1. Remove the power window master switch.
• 4-door (see page 22-305)
• 2-door (see page 22-306)
2. Test the motor in each direction by connecting battery
power and ground t ...
 Rear Power Window Motor Test
1. Remove the rear power window switch (see page
22-307).
2. Test the motor in each direction by connecting battery
power and ground to the rear power window switch
14P connector (A) according t ...
See also:
A/C Compressor Replacement
NOTE: Do not install the A/C compressor into a system
unless you are completely sure that the system is free of
contamination. Installing the A/C compressor into a
contaminated system can result in ...
A/C Refrigerant Oil Replacement
Recommended PAG oil: DENSO ND-OIL 8
P/N 38897-PR7-A01AH: 120 m l (4 fl-oz)
It is important to have the correct amount of refrigerant
oil in the A/C system to ensure proper lubrication of the
A/C c ...
Adjust the Head Restraints
Adjust the driver’s head restraint so
the center of the back of your head
rests against the center of the
restraint.
Have passengers adjust their head
restraints properly as well. Taller ...