 Honda Accord: Driver's Power Window Motor Test
Motor Test
1. Remove the power window master switch.
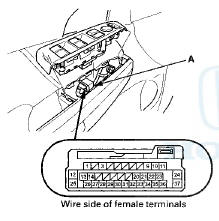
• 4-door (see page 22-305) • 2-door (see page 22-306) 2. Test the motor in each direction by connecting battery power and ground to the power window master switch 37P connector (A) according to the table.

4-door
2-door
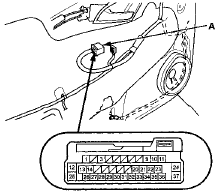
Wire side of female terminals
3. If the motor does not run or fails to run smoothly, go to step 4, if the motor runs smoothly, go to step 8.
4. For 4-door: Remove the door panel (see page 20-17).
5. Disconnect the 6P connector (A) from the driver's power window motor (B).
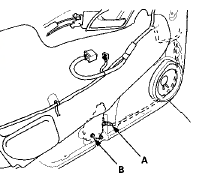
6. Check for continuity between the door multiplex control unit 37P connector terminals and driver's power window motor 6P connector terminals as shown. There should be continuity.

DRIVER'S POWER WINDOW MOTOR 6P CONNECTOR
Wire side of female terminals
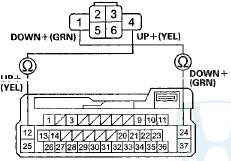
DOOR MULTIPLEX CONTROL UNIT 37P CONNECTOR
Wire side of female terminals
7. If there is no continuity, repair an open or high resistance in the wire(s). If the wire harness is OK, replace the driver's power window motor.
Hall C unit (Pul.e.) Te:t
8. Check for continuity between driver's power window motor 6P connector terminal No. 2 and body ground.
There should be continuity.
• If there is continuity, go to step 9.
• If there is no continuity, check for an open or high resistance in the BLK wire or poor ground (G501).
DRIVER'S POWER WINDOW MOTOR 6P CONNECTOR
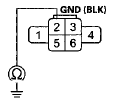
Wire side of female terminals
9. Do the power window master switch input test terminals No. 3, No. 20, and No. 22 (see page 22-292).
 Front Passenger's Power Window
Switch Input Test
1. Turn the ignition switch to LOCK (0), open and close the driver's door,
then remove the front passenger's power
window switch.
• 4-door (see page 22-306)
• 2-door (see page 22-307)
...
 Front Passenger's Power Window
Motor Test
With AUTO UP/AUTO DOWN function
Motor Test
1. Remove the front passenger's power window switch:
• 4-door (see page 22-306)
• 2-door (see page 22-307)
2. Test the motor in each direction ...
See also:
Playing an iPod (Models without navigation system)
Playing an iPod (Models without navigation system) ...
Oil Pump Chain Replacement
NOTE: Keep the oil pump chain away from magnetic
fields.
Removal
1. Remove the drive belt (see page 4-30).
2. Remove the oil pan (see page 7-11).
3. Support the engine with a jack and a wood ...
Reverse Lockout
6-speed manual transmission only
The manual transmission has a
lockout so you cannot accidentally
shift from any forward gear to
reverse while the vehicle is moving
at a certain speed. If you ...
