 Honda Accord: Front Passenger's Power Window
Switch Input Test
Honda Accord: Front Passenger's Power Window
Switch Input Test
1. Turn the ignition switch to LOCK (0), open and close the driver's door, then remove the front passenger's power window switch.
• 4-door (see page 22-306)
• 2-door (see page 22-307)
2. Disconnect the 37P connector (A) from the front passenger's power window switch (B).
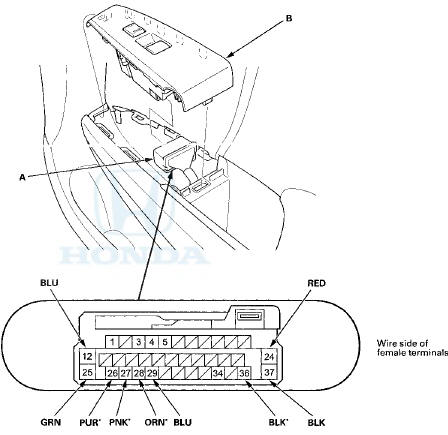
*: With front passenger's power window AUTO UP/AUTO DOWN function
3. Inspect the connector and socket terminals to be sure they are all making good contact.
• If the terminals are bent, loose or corroded, repair them as necessary and recheck the system.
• If the terminals look OK, go to step 4 .
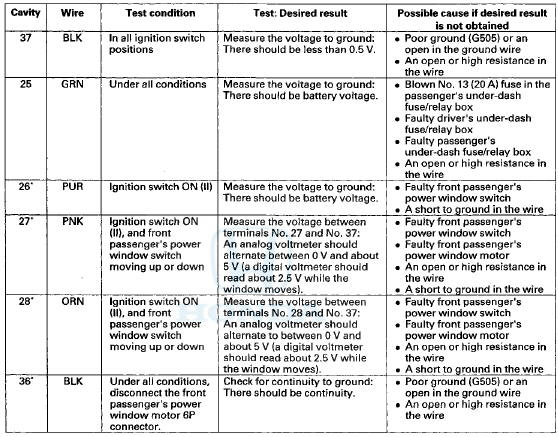
4. Reconnect the connector to the front passenger's power window switch, turn the ignition switch to ON (II), and do these input tests at the following connector.
• If any test indicates a problem, find and correct the cause, then recheck the system.
• If all the input tests prove OK, go to step 5.
*: Front passenger's power window AUTO UP/AUTO DOWN function
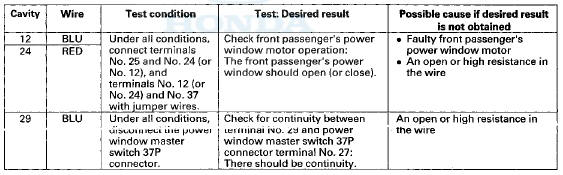
5. Turn the ignition switch to LOCK (0), open and close the driver's door, then disconnect the 37P connector from the front passenger's power window switch again.
6, With the connector still disconnected, do these input tests at the following connector.
• If any test indicates a problem, find and correct the cause, then recheck the system.
• If all the input tests prove OK, replace the front passenger's power window switch, then go to step 7.
- 4-door (see page 22-306)
- 2-door (see page 22-307)
7. With the front passenger's power window AUTO UP/AUTO DOWN function, reset the power window control unit (see page 22-280).
 Power Window Master Switch Input
Test
Power Window Master Switch Input
Test
NOTE: Before testing, troubleshoot the multiplex integrated control unit
first, using B-CAN System Diagnosis Test Mode
A (see page 22-134).
1. Turn the ignition switch to LOCK (0), open and clos ...
 Driver's Power Window Motor Test
Motor Test
1. Remove the power window master switch.
• 4-door (see page 22-305)
• 2-door (see page 22-306)
2. Test the motor in each direction by connecting battery
power and ground t ...
See also:
Transmission Fluid Pressure Switch A
(2nd Clutch) Replacement
1. Remove the intake air duct.
2. Disconnect the connector (A) from the transmission
fluid pressure switch A (2nd clutch) (B), and remove
the transmission fluid pressure switch A (2nd clutch).
...
Valve Seat Reconditioning
1. Inspect the valve stem-to-guide clearance (see page
6-88). If the valve guides are worn, replace them (see
page 6-88) before cutting the valve seats.
2. Renew the valve seats in the cylinder h ...
Emissions Testing
Testing of Readiness Codes
If you take your vehicle for an
emissions test shortly after the
battery has been disconnected or
gone dead, it may not pass the test.
This is because of certain ‘ ...