 Honda Accord: A/C Signal Circuit Troubleshooting
1. Start the engine, and let it idle.
2. Turn the blower switch on.
3. Turn the A/C switch on.
4. Check the A/C CLUTCH in the DATA LIST with the HDS.
Does it indicate ON? YES
-Go to step 5.
NO
-Do the A/C system test (see page 21-89).
5. Check the A/C system.
Does the A/C system operate? YES-
The air conditioning system circuit is OK.
NO
-Go to step 6.
6. Turn the ignition switch to LOCK (0).
7. Turn the ignition switch to ON (II).
8. Activate the A/C CLUTCH in the INSPECTION MENU with the HDS.
Is there a clicking noise from the A/C compressor clutch? YES
-Do the A/C system test (see page 21-89).
NO-
Go to step 9.
9. Turn the ignition switch to LOCK (0).
10. Jump the SCS line with the HDS.
11. Disconnect ECM/PCM connector A (49P).
12. Turn the ignition switch to ON (II).
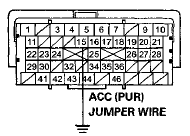
13. Momentarily connect ECM/PCM connector terminal A15 to body ground with a jumper wire several times.
ECM/PCM CONNECTOR A (49P)

Terminal side of female terminals
Is there a clicking noise from the A/C compressor clutch? YES
-Update the ECM/PCM if it does not have the latest software (see page 11-203), or substitute a known-good ECM/PCM (see page 11-7), then recheck.
If the symptom/indication goes away and the ECM/PCM was updated, troubleshooting is complete.
If the symptom/indication goes away and the ECM/PCM was substituted, replace the original ECM/PCM (see page 11-204).
NO
-Check for poor connections or loose terminals at the A/C compressor clutch relay and the ECM/PCM. If the connections are OK, check the A/C compressor clutch relay (see page 22-93). If needed, repair open in the wire between the ECM/PCM (A15), the A/C compressor clutch relay, or other parts in the A/C systems.
 DTC Troubleshooting
DTC P0506: idle Control System RPM Lower
Than Expected
NOTE: Before you troubleshoot record all freeze data
and any on-board snapshot, and review the general
troubleshooting information (see page ...
 Alternator FR Signal Circuit
Troubleshooting
1. Start the engine, and let it idle.
2. Monitor the ALTERNATOR in the DATA LIST with the
HDS.
3. Check if the indicated percentage varies when the
headlight switch is turned on.
Does the p ...
See also:
Ignition Switch Test
NOTE: SRS components are located in the area. Review
the SRS component locations 4-door (see page 24-21),
2-door (see page 24-23), and precautions and
procedures (see page 24-25) before doing repai ...
Drive Belt
Removal/Installation
Special Tools Required
Belt Tension Release Tool Snap-on YA9317 or
equivalent, commercially available
1. Move the auto-tensioner (A) with the belt tension
release tool (B) in the direction of the ...
Stabilizer Bar Replacement
1. Raise and support the vehicle (see page 1-13).
2. Remove the rear wheels.
3. Disconnect both stabilizer links from the stabilizer bar
(see page 18-47).
4. Remove the flange bolts (A) and ...
