 Honda Accord: Alternator FR Signal Circuit
Troubleshooting
Honda Accord: Alternator FR Signal Circuit
Troubleshooting
1. Start the engine, and let it idle.
2. Monitor the ALTERNATOR in the DATA LIST with the HDS.
3. Check if the indicated percentage varies when the headlight switch is turned on.
Does the percentage wary? YES
-The alternator signal circuit is OK.gH NO
-Go to step 4.
4. Turn the headlight switch off and ignition switch to LOCK (0).
5. Jump the SCS line with the HDS.
6. Disconnect the alternator 4P connector.
7. Disconnect ECM/PCM connector B (49P).
8. Check for continuity between ECM/PCM connector terminal B47 and body ground.
ECM/PCM CONNECTOR B (49P)
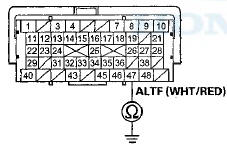
Terminal side of female terminals
Is there continuity? YES-
Repair short in the wire between the ECM/PCM (B47) and the alternator.
NO
-Update the ECM/PCM if it does not have the latest software (see page 11-203), or substitute a known-good ECM/PCM (see page 11-7), then recheck.
If the symptom/indication goes away and the ECM/PCM was updated, troubleshooting is complete.
If the symptom/indication goes away and the ECM/PCM was substituted, replace the original ECM/PCM (see page 11-204).
 A/C Signal Circuit Troubleshooting
1. Start the engine, and let it idle.
2. Turn the blower switch on.
3. Turn the A/C switch on.
4. Check the A/C CLUTCH in the DATA LIST with the
HDS.
Does it indicate ON?
YES-Go to step ...
 PSP Switch Signal Circuit
Troubleshooting
PSP Switch Signal Circuit
Troubleshooting
1. Start the engine, and let it idle.
2. Align the steering wheel straight ahead.
3. Check the PSP SWITCH in the DATA LIST with the
HDS.
Does it indicate ON?
YES-Go to step 4.
NO-Go to s ...
See also:
Passenger's Air Mix Control Motor
Test
NOTE: Before testing the motor, check for HVAC DTCs
(see page 21-101).
1. Disconnect the 7P connector from the passenger's air
mix control motor.
Incorrectly applying power and ground to the
...
Loading Discs in the Changer
To load multiple discs in one
operation:
1. With the ignition in the
ACCESSORY (I) or the ON (II)
position, press and hold the LOAD
button until you hear a beep and
see ‘‘LOAD’’ in ...
Load Limits
The maximum load for your vehicle
is 850 lbs (385 kg).
See Tire And Loading Information
label attached to the driver’s
doorjamb.
Label Example
This figure includes the total weight
of a ...