 Honda Accord: PSP Switch Signal Circuit
Troubleshooting
Honda Accord: PSP Switch Signal Circuit
Troubleshooting
1. Start the engine, and let it idle.
2. Align the steering wheel straight ahead.
3. Check the PSP SWITCH in the DATA LIST with the HDS.
Does it indicate ON? YES
-Go to step 4.
NO
-Go to step 14.
4. Turn the steering wheel to the full lock position.
5. Check the PSP SWITCH in the DATA LIST with the HDS.
Does it change to OFF? YES
-The PSP switch signal circuit is OK.
NO
-Go to step 6.
6. Turn the ignition switch to LOCK (0).
7. Disconnect the PSP switch 2P connector.
8. Start the engine.
9. Check the PSP SWITCH in the DATA LIST with the HDS.
Does it change to OFF? YES
-Replace the PSP switch (see page 17-29).
NO
-Go to step 10.
10. Turn the ignition switch to LOCK (0).
11. Jump the SCS line with the HDS.
12. Disconnect ECM/PCM connector A (49P).
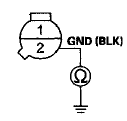
13. Check for continuity between PSP switch 2P connector terminal No. 1 and body ground.
PSP SWITCH 2P CONNECTOR
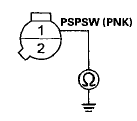
Wire side of female terminals
Is there continuity? YES
-Repair short in the wire between the ECM/PCM (A23) and the PSP switch.
NO
-Update the ECM/PCM if it does not have the latest software (see page 11-203), or substitute a known-good ECM/PCM (see page 11 -7), then recheck.
If the symptom/indication goes away and the ECM/PCM was updated, troubleshooting is complete.
If the symptom/indication goes away and the ECM/PCM was substituted, replace the original ECM/PCM (see page 11-204).
14. Turn the ignition switch to LOCK (0).
15. Disconnect the PSP switch 2P connector.
16. Connect PSP switch 2P connector terminals No. 1 and No. 2 with a jumper wire, then start the engine.
PSP SWITCH 2P CONNECTOR
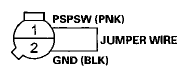
Wire side of female terminals
17. Check the PSP SWITCH in the DATA LIST with the HDS.
Does it change to ON? YES-Replace the PSP switch (see page 17-29).B NO-Go to step 18.
18. Turn the ignition switch to LOCK (0).
19. Remove the jumper wire from the PSP switch 2P -С› connector.
20. Jump the SCS line with the HDS.
21. Disconnect ECM/PCM connector A (49P).
22. Connect PSP switch 2P connector terminal No. 1 to body ground with a jumper wire.
PSP SWITCH 2P CONNECTOR
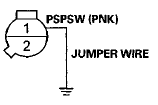
Wire side of female terminals
23. Check for continuity between ECM/PCM connector terminal A23 and body ground.
ECM/PCM CONNECTOR A (49P)
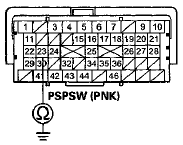
Terminal side of female terminals
Is there continuity? YES
-Go to step 24.
NO
-Repair open in the wire between the PSP switch and the ECM/PCM (A23).
24. Check for continuity between PSP switch 2P connector terminal No. 2 and body ground.
PSP SWITCH 2P CONNECTOR
Wire side of female terminals
Is there continuity? YES
-Update the ECM/PCM if it does not have the latest software (see page 11-203), or substitute a known-good ECM/PCM (see page 11-7), then recheck.
If the symptom/indication goes away and the ECM/PCM was updated, troubleshooting is complete.
If the symptom/ indication goes away and the ECM/PCM was substituted, replace the original ECM/PCM (see page 11-204).
NO
-Repair open in the wire between the PSP switch and G201 (see page 22-26) .
 Alternator FR Signal Circuit
Troubleshooting
Alternator FR Signal Circuit
Troubleshooting
1. Start the engine, and let it idle.
2. Monitor the ALTERNATOR in the DATA LIST with the
HDS.
3. Check if the indicated percentage varies when the
headlight switch is turned on.
Does the p ...
 Brake Pedal Position Switch Signal
Circuit Troubleshooting
Brake Pedal Position Switch Signal
Circuit Troubleshooting
1. Turn the ignition switch to ON (II).
2. Check the BRAKE SWITCH in the DATA LIST with the
HDS.
Does it indicate OFF?
YES-Go to step 3.
NO-lnspect the brake pedal position switch (see page ...
See also:
Door Locks
To lock both doors, push the front of
the master door lock switch on
either door, pull the lock tab
rearward on the driver’s door, or use
the key on the outside lock on the
driver’s do ...
Transmission Installation
Special Tools Required
- Engine Support Hanger, A and Reds AAR-T1256*
- Engine Hanger Adapter VSB02C000015*
- Subframe Adapter VSB02C000016*
- Subframe Alignment Pin 070AG-SJAA10S
*: Are availabl ...
CMP Sensor B Replacement
1. Disconnect the connector (A) and hoses (B) from the
EVAP canister purge valve (C), then remove the EVAP
canister purge valve assembly.
2. Disconnect the CMP sensor B connector (A).
3. Remov ...