 Honda Accord: Playing XM® Radio
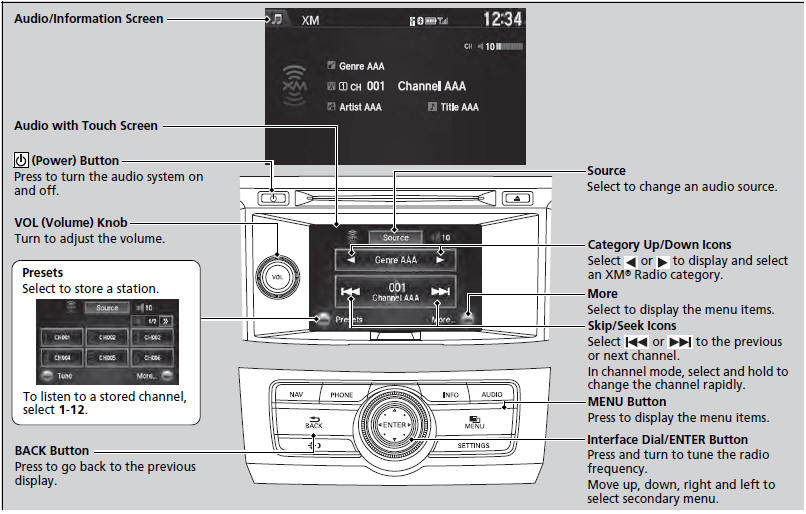
• To Play the XM® Radio
1. Select the XM® mode.

2. Press the MENU button.
3. Rotate  to select XM Tune
Mode, then press
to select XM Tune
Mode, then press  .
.
4. Rotate  to select Channel
Mode or Category Mode, then press
to select Channel
Mode or Category Mode, then press
 .
.
5. Rotate  to select Channel
List, then press
to select Channel
List, then press  .
.
6. Rotate  to select a channel from
a list, then press
to select a channel from
a list, then press  .
.

2. Select More.
3. Select Tune Mode.
4. Select CH Channel Mode or CAT Category Mode.
5. Select a channel using the  icons on the tune mode screen or
the preset numbers (1-12) on the preset mode screen.
icons on the tune mode screen or
the preset numbers (1-12) on the preset mode screen.
You can control the XM® radio using voice commands.
In the channel mode, all available channels are selectable. In the category mode, you can select a channel within a category (Jazz, Rock, Classical, etc.).
There may be instances when XM® Radio does not broadcast all the data fields (artist name, title). This does not indicate a problem with your audio system.
• Preset Memory
To store a station:
1. Tune to the selected station.

2. Press the MENU button.
3. Rotate  to select Save Preset,
then press
to select Save Preset,
then press  .
.
4. Rotate  to select the preset
number you want to store that station, then press and hold
to select the preset
number you want to store that station, then press and hold
 .
.

2. Select More.
3. Select Save Preset.
4. Select the preset number you want to store that station.
You can store 12 XM® stations into the preset memory.
 Playing AM/FM Radio
• Preset Memory
To store a station:
1. Tune to the selected station.
2. Press the MENU button.
3. Rotate to select Save Preset,
then press .
4. Rotate to select the preset
number you ...
 Playing a CD
Your audio system supports audio CDs, CD-Rs and CD-RWs in either MP3, WMA, or
AAC*1 format. With the CD loaded, select the CD mode.
• How to Select a File from the Music Search List
(MP3/WMA/ ...
See also:
Damper/Spring Removal and Installation
Removal
1. Raise and support the vehicle (see page 1-13).
2. Remove the front wheel.
3. Remove the wheel speed sensor harness bracket
mounting bolt (A).
4. Remove the damper pinch b ...
Close and Lock the Doors
After everyone has entered the
vehicle, be sure the doors are closed
and locked.
Your vehicle has a door and
trunk open indicator on the
instrument panel to indicate when a
specific door ...
Oil Pump Chain Replacement
NOTE: Keep the oil pump chain away from magnetic
fields.
Removal
1. Remove the drive belt (see page 4-30).
2. Remove the oil pan (see page 7-11).
3. Support the engine with a jack and a wood ...