
 Honda Accord: Rear Bumper Removal/Installation
NOTE: - Have an assistant help you when removing and installing the rear bumper.
- Take care not to scratch the rear bumper or the body.
- Put on gloves to protect your hands.
- When prying with a flat-tip screwdriver, wrap it with protective tape to prevent damage.
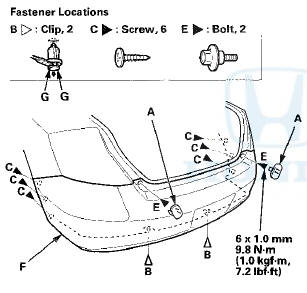
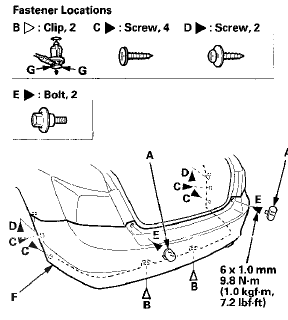
1. Remove the caps (A). Remove the clips (B), the screws (C, D)f and the bolts (E) securing the rear bumper (F).
NOTE: To release the clips, pry up on the center pin at the notch (G).
2-door
4-door
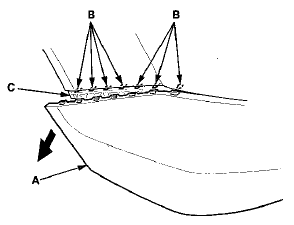
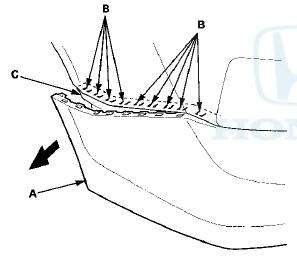
2. Pull out the rear bumper (A) at the wheel arch areas to release it from the hooks (B) on the side spacers (C).
2-door
4-door
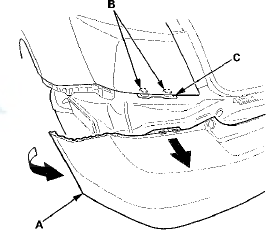
3. With the help of an assistant, pull out one side of the rear bumper (A) to release the hooks (B) on the side bracket (C) as shown. Repeat this step on the opposite side.
2-door
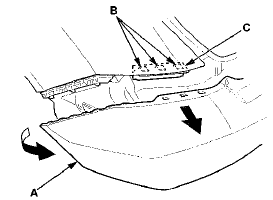
4-door
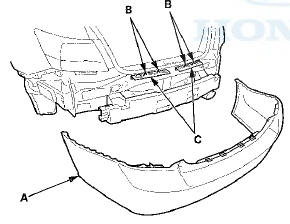
4. With the help of an assistant pull out the rear bumper (A) to release the hooks (B) on the upper brackets (C).
2-door: Disconnect the rear license plate light connector (D).
2-door
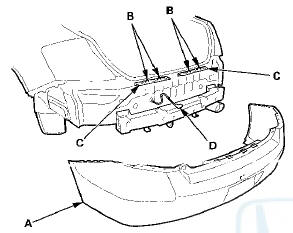
4-door
5. If necessary, remove the rear bumper absorber (A) from the rear bumper beam (B) by pulling the absorber to release the posts (C) on both sides.
2-door
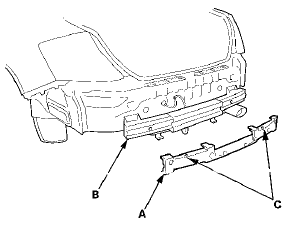
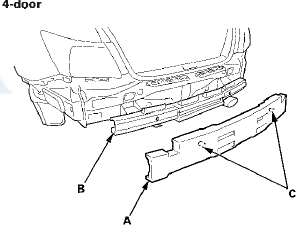
6. Install the bumper in the reverse order of removal, and note these items: - Make sure the rear bumper engages the hooks (of both the side brackets and the side spacers) on each side securely.
- If the clips are damaged or stress-whitened, replace them with new ones.
- Push the clips, the hooks, and the posts into place securely.
 Front Air Spoiler Replacement
NOTE:
-Take care not to scratch the front bumper,
- Put on gloves to protect your hands.
- When prying with a flat-tip screwdriver,
wrap it with
protective tape to prevent damage.
1. Remove ...
 Rear Bumper Finisher Cover
Replacement
Rear Bumper Finisher Cover
Replacement
2-door
NOTE:
- Put on gloves to prevent damage.
- Take care not to scratch the rear bumper or the body.
- When prying with a flat-tip screwdriver, wrap it with
protective tape to prevent dama ...
See also:
Relays
Power Relay Test
Special Tools Required
Relay Puller 07AAC-000A1A0
Use this chart to identify the type of relay, then do the
test listed for it.
*1:'08-09 models
*2: Carefully remove the relay ...
Menu Display
To select any setting such as the
clock, sound adjusting, or the
compass (if equipped), press the
MENU button. To use any audio
system function, the ignition switch
must be in the ACCESSORY ...
Key Interlock Solenoid Test
NOTE: SRS components are located in this area. Review
the SRS component locations for 4-door (see page
24-21),for 2-door (see page 24-23), and the precautions
and procedures (see page 24-25) before ...