 Honda Accord: Pressure Test
Special Tools Required
•A/T Oil Pressure Gauge Set 07406-0020400 or 07406-0020401
•A/T Pressure Hose, 2,210 mm 07MAJ-PY4011A
•A/T Pressure Adapter 07MAJ-PY40120
NOTE: -Disable the VSA (if equipped) by pressing the VSA OFF button.
-ABS or VSA DTC(s) may come on during the test-drive. If the ABS or VSA DTC(s) come on, clear the DTC(s) with the HDS.
1. Make sure the transmission fluid is filled to the proper level (see page 14-191).
2. Raise the vehicle on a lift, or apply the parking brake, block both rear wheels, and raise the front of the vehicle. Make sure it is securely supported.
3. Allow the front wheels to rotate freely.
4. Remove the splash shield.
5. Connect the HDS to the DLC (A) located under the driver's side of the dashboard.
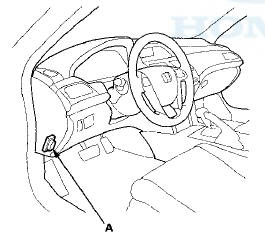
6. Turn the ignition switch to ON (II), and go to the A/T Data List. Make sure the HDS communicates with the PCM. If it does not, go to the DLC circuit troubleshooting (see page 11-181).
7. Connect the A/T oil pressure gauge to the line pressure inspection port (A). Do not allow dust or other foreign particles to enter the port while connecting the gauge.

8. Start the engine, and warm it up to normal operating temperature (the radiator fan comes on).
9. Hold the engine speed at 2,000 rpm with the shift lever in Por N.
10. Measure the line pressure at the line pressure inspection port (A).
NOTE: Higher pressure may be noticed if measurements are taken with the shift lever in any position other than P or N.
11. Turn the engine off, then disconnect the A/T oil pressure gauge from the line pressure inspection port.
12. Install the sealing bolt in the line pressure inspection port with a new sealing washer, and tighten the sealing bolt to 18 N-m (1.8 kgfm, 13 Ibfft). Do not reuse the old sealing washer.
13. Connect the A/T oil pressure gauge to the 1st clutch pressure inspection port (B).

14. Remove the intake air duct and the air cleaner housing, and connect the A/T oil pressure gauge to the 2nd clutch pressure inspection port (C). Then temporarily install the air cleaner housing and the intake air duct.
15. Start the engine, and shift to D.
16. Shift to 1st gear, and measure the 1st clutch pressure at the 1st clutch pressure inspection port (B) while holding the engine speed at 2,000 rpm.
17. Shift up to 2nd gear, and measure the 2nd clutch pressure at the 2nd clutch pressure inspection port (C) while holding the engine speed at 2,000 rpm.
18. Turn the engine off, then disconnect the A/T oil pressure gauges from the 1st clutch pressure and the 2nd clutch pressure inspection ports.
19. Install the sealing bolts in the 1st clutch pressure and the 2nd clutch pressure inspection ports with new sealing washers, and tighten the sealing bolts to 18 N-m (1.8 kgfm, 13 Ibf-ft). Do not reuse the old sealing washers.
20. Install the air cleaner housing and the intake air duct.
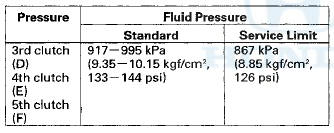
21. Connect the A/T oil pressure gauge to the 3rd clutch pressure inspection port (D) and the 5th clutch pressure inspection port (F).
22. Connect the A/T oil pressure gauge to the 4th clutch pressure inspection port (E).
23. Start the engine with the shift lever in P, while pressing the brake pedal.
24. Shift to D, and release the brake pedal; the transmission is in 1st gear.
25. Press the accelerator pedal to increase the engine speed to 2,500 rpm, then shift to 2nd gear.
26. Release the accelerator pedal slowly to close the throttle over 5 seconds; the engine speed decreases to 1,000 rpm with the transmission in 2nd gear.
27. Press the accelerator pedal very slowly to increase the engine speed to 2,000 rpm over 5 seconds, and hold the accelerator. Shift to Srd gear, and measure the 3rd clutch pressure at the Srd clutch pressure inspection port (D) while holding the engine speed at 2,000 rpm.
28. Shift to 4th gear, and measure the 4th clutch pressure at the 4th clutch pressure inspection port (E).
29. Shift to 5th gear, and measure 5th clutch pressure at the 5th clutch pressure inspection port (F) while holding the engine speed at 2,000 rpm.
30. Bring the engine back to an idle, then apply the brake pedal to stop the wheels from rotating.
31, Shift to R, then release the brake pedal. Raise the engine speed to 2,000 rpm, and measure 4th clutch pressure at the 4th clutch pressure inspection port (E).
32. Turn the engine off, then disconnect the A/T oil pressure gauges from the 3rd, 4th, and 5th clutch pressure inspection ports.
33.Install the sealing bolts in the 3rd, 4th, and 5th clutch pressure inspection ports with new sealing washers, and tighten the sealing bolts to 18 N-m (1.8 kgf-m, 13 Ibf-ft). Do not reuse the old sealing washers.
34.If any of the pressures are out of the service limit, refer to the problems and probable causes listed in the table.
35. Install the splash shield.
36. Check the ATF level (see page 14-191).
 Stall Speed Test
1. Wake sure the transmission fluid is filled to the proper
level (see page 14-191).
2. Apply the parking brake, and block all four wheels.
3. Connect the HDS to the DLC (A) located under the
...
 Shift Solenoid Valve Test,
Replacement, and Shift Solenoid
Wire Harness Replacement
Shift Solenoid Valve Test,
Replacement, and Shift Solenoid
Wire Harness Replacement
1. Connect the HDS to the DLC (A) located under the
driver's side of the dashboard.
2. Turn the ignition switch to ON (II). Make sure the HDS
communicates with the PCM. If it does not go to the
...
See also:
Lower Arm A Replacement
1. Raise and support the vehicle (see page 1-13).
2. Remove the rear wheel.
3. Remove the parking brake cable mounting bolt (B).
4. Remove the lower arm A mounting bolts, then
remove lower a ...
MICU Input Test
NOTE; Before testing, troubleshoot the multiplex integrated control unit
first, using B-CAN System Diagnosis Test Mode A (see page 22-134).
Drivers MICU
1. Turn the ignition switch to LOCK (0), an ...