 Honda Accord: ODS Unit Operation Check
Check the ODS operation after any of these actions: • Replacement of front passenger's seat component(s) (except ODS unit and/or weight sensors)
• After a vehicle collision
• SRS unit replacement
Preoperation Check Setup
• Make sure all the components of the front passenger's seat are correctly installed.
• Position the front passenger's seat to the rearmost position. Adjust the seat-back to the forward most position. Do not move the seat from this position.
• Make sure nothing is on the front passenger's seat.
• Make sure there is nothing in the front passenger's seat-back pocket.
• Keep the windows and the moonroof closed.
• Do all calibration procedures, except test-driving, in the service bay.
• Make sure the vehicle is on level ground.
• Turn the heater and the A/C off. .
• Do not touch the passenger's seat during the operation check.
• Do not expose the front passenger's seat to sudden temperature changes.
• Make sure all aftermarket devices such as amplifiers, fluorescent light, air purifiers, CB or HAM radios, etc.
are turned off.
After Replacing Front Passenger's Seat Component(s)
1. Make sure the ignition switch is in LOCK (0).
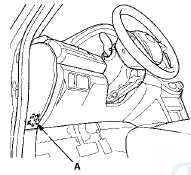
2. Connect the HDS to the data link connector (DLC) (A).
3. Turn the ignition switch to ON (II).
4. Make sure the HDS communicates with the vehicle and the SRS unit. If it does not communicate, troubleshoot the DLC circuit (see page 11-181).
5. Drive the vehicle, accelerate to 20 mph (36 km/h), then stop on level ground.
6. From the HDS Main Menu, select SRS, then Inspection. In the Inspection Menu, select SEAT OUTPUT CHECK. Follow the prompts until the ODS unit operation check has been completed.
7. Turn the ignition switch to LOCK (0).
8. Disconnect the HDS from the DLC.
 ODS Unit Initialization
NOTE:
• After SRS unit or ODS unit is replaced, do this
procedure to initialize the ODS unit.
• ODS unit initialization will initialize both OPDS sensor
and front passenger's weight se ...
 Front Passenger's Weight Sensor Output Check After
a Vehicle Collision
Front Passenger's Weight Sensor Output Check After
a Vehicle Collision
1. Position the front passenger's seat to the rear most
position, and adjust the seat-back to the forward most
position. Do not move the seat from this position.
2. Drive the vehicle, accelerate ...
See also:
Protecting Children - General Guidelines
Children depend on adults to protect
them. However, despite their best
intentions, many adults do not know
how to properly protect child
passengers.
If you have children, or ever need to
...
Main Valve Body Disassembly,
Inspection, and Reassembly
1. Clean all parts thoroughly in solvent, and dry them with compressed air.
Blow out all passages.
2. Do not use a magnet to remove the check balls, it may magnetize the balls.
3. Inspect the ...
Playing a CD
Your audio system supports audio CDs, CD-Rs and CD-RWs in either MP3, WMA, or
AAC*1 format. With the CD loaded, select the CD mode.
• How to Select a File from the Music Search List
(MP3/WMA/ ...