 Honda Accord: Sunlight Sensor Test
N O T E ; Before testing t h e sensor, check for HVAC DTCs (see page 21-101).
1. Remove the sunlight sensor (see page 21 -186).
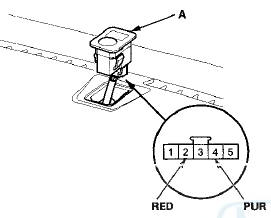
With automatic lighting sensor
Without automatic lighting sensor
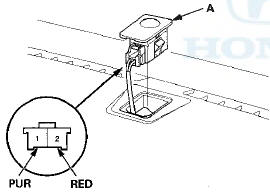
2. Turn the ignition switch to ON (II). Measure the voltage between the terminals with the (+) probe on terminal No. 4 (with automatic lighting sensor) or No. 1 (without automatic lighting sensor) and the ( — ) probe on terminal No. 2 with the connector connected.
NOTE: The voltage readings will not change underthe light of a flashlight or a fluorescent lamp. Voltage should be: • 3.6—3.7 V or more with the sensor out of direct sunlight.
• 3.3—3.5 V or less with the sensor in direct sunlight.
3. If the voltage is not as specified, replace the sunlight sensor (see page 21-186).
 Outside Air Temperature Sensor
Replacement
Outside Air Temperature Sensor
Replacement
1. Lift the tab (A) to release the lock, then remove the
outside air temperature sensor (B) from the front
bumper beam. Disconnect the 2P connector (C) from
the outside air temperature sensor.
2 ...
 Sunlight Sensor Replacement
1. Remove the sunlight sensor (A) from the dashboard,
then disconnect the connector (B). Be careful not to
damage the sensor and the dashboard.
2. Install the sensor in the reverse order of remov ...
See also:
Front Bumper Removal/Installation
NOTE:
- Have an assistant help you when removing and
installing the front bumper.
- Take care not to scratch the front bumper
or the body.
- Put on gloves to protect your hands.
- When pr ...
Clutch Wave-plate Phase Difference
Inspection
1. Place the clutch wave-plate (A) on a surface plate, and
set a dial indicator (B) on the wave-plate.
2. Find the bottom (C) of a phase difference of the
wave-plate, zero the dial indicator an ...
Light Switches
• Manual Operation
Rotating the light switch turns the lights on
and off, regardless of the position of the
ignition switch*1.
• High beams
Push the lever forward until you hear a click.
...