 Honda Accord: Glass Weatherstrip Replacement
1 . Remove the moonroof glass (see page 20-91).
2. Place a piece of masking tape (A) on the middle of the front edge of the moonroof glass (B). Make sure that the tape is on the glass only, and is not touching the weatherstrip.
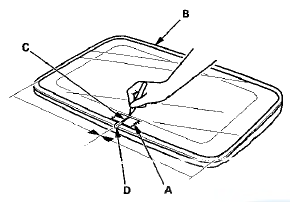
3. Place a mark (C) on the masking tape that aligns with the seam (D) of the weatherstrip.
4. Push down on the top of the old weatherstrip with your thumb until a small section separates from the moonroof glass. Once a section has started to separate, grip it and pull outward, working around the moonroof glass until the weatherstrip is completely removed (note the locations of the holes in the weatherstrip).
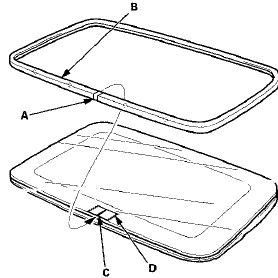
5. Align the seam (A) of the new weatherstrip (B) to the mark (C) on the masking tape (D). Make sure the holes are pointed in the same direction as noted in step 4.
6. Press the ridge of the new weatherstrip into the groove on the moonroof glass starting at the seam.
Work toward one corner; then go back to the middle and work toward the opposite corner. Be careful not to stretch the weatherstrip.
7. Continue pressing along one side, from corner to corner; then press along the opposite side, from corner to corner.
8. At the rear of the moonroof glass, continue pressing from one corner to the middle; then press from the opposite corner to the middle until the strip is completely installed.
9. Reinstall the moonroof glass (see page 20-91).
10. Check for proper fit of the new weatherstrip by opening and closing the moonroof.
 Glass Replacement
1. Close the glass fully.
2. Slide the sunshade all the way back.
3. Pry out the lid (A), remove the screw (B), and release
the hooks (C), then remove the bracket cover (D).
Repeat on the op ...
 Wind Deflector Replacement
NOTE: When prying with a flat-tip screwdriver, wrap it
with protective tape to prevent damage.
1. Open the glass fully.
2. Remove the deflector links (A) from both sides.
3. Remove the wind ...
See also:
Ignition Key Switch Test
1. Remove the steering column upper and lower covers
(see page 20-181).
2. Disconnect the 6P connector (A).
3. Check for continuity between terminals No. 1 and No.
2.
• There should ...
Fuel Tank Replacement
1. Drain the fuel tank (see page 11 -309).
2. Reinstall the fuel tank unit without connecting the fuel
tank unit 4P connector and the quick-connect fitting
(see page 11-321).
3. Remove the fue ...
Modifications
Do not modify your vehicle or use non-Honda components that can affect its
handling, stability, and reliability.
Overall vehicle performance can be affected. Always make sure all equipment
is
p ...