 Honda Accord: Gearbox Mount Cushion Replacement
1. Remove the steering gearbox (see page 17-37).
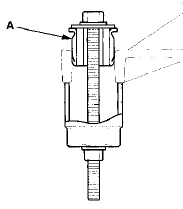
2. Position a 40 mm socket (A) on the flange part of the gearbox housing with a washer (B), a 10 x 150 mm flange bolt (C), and a 10 mm nut (D) as shown.

3. Hold the flange bolt with a wrench, and tighten the nut with a wrench. Remove the gearbox mount cushion ( E ) .
4. Apply a mild soap and water solution to the new gearbox mount cushion surface (A), then place the mount cushon on the gearbox mounting cushion hole.
5. Position a 40 mm socket on the flange part of the gearbox housing with a washer, a flange bolt, and a nut as shown.
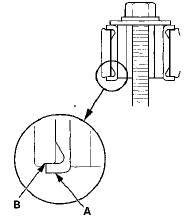
6. Install the gearbox mount cushion by tightening the nut until the mount cushion edge (A) properly fits on the gearbox flange surface (B).
7. Install the steering gearbox (see page 17-60).
 Tie-rod End Ball Joint Boot Replacement
Special Tools Required
Bearing Driver Attachment, 36 07965-SA50500
1 Disconnect the tie-rod end ball joint from the knuckle
(see step 26 on page 17-41).
2. Remove the tie-rod end from the rack e ...

See also:
Malfunction Indicator Lamp
If the indicator comes on
while driving, it means one
of the engine’s emissions control
systems may have a problem. Even
though you may feel no difference in
your vehicle’s performance ...
XM Radio Display Messages
‘‘LOADING’’ - XM is loading the audio or program information.
‘‘OFF AIR’’ - The channel currently selected is no longer
broadcasting.
‘‘UPDATING’’ - The encryption code is ...
Turn Signals
The turn signals can be used when the ignition
switch is in ON .
• One-touch turn signal
When you lightly push up or down and release
the turn signal lever, the exterior turn signals
and t ...