 Honda Accord: Fuel Tank Replacement
1. Drain the fuel tank (see page 11 -309).
2. Reinstall the fuel tank unit without connecting the fuel tank unit 4P connector and the quick-connect fitting (see page 11-321).
3. Remove the fuel fill pipe cover (see page 11-327).
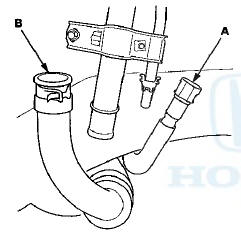
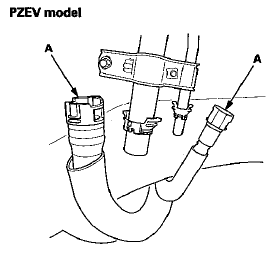
4. Disconnect the quick-connect fittings (A) (see page 11-314) (and on all models except PZEV, disconnect the fuel fill tube (B) from the fuel fill pipe).
Slide back the clamps, then twist the hose as you pull to avoid damaging them.
All models except PZEV
5. Raise the vehicle on a lift.
6. Disconnect the hose (A) from the EVAP canister.
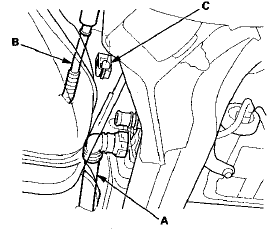
7. Remove the hose (B) from the clamp (C).
NOTE: Be careful not to damage the hose.
8. Remove the exhaust pipe (see page 9-9).
9. Remove the right side middle floor undercover (see page 20-293).
10. Remove the fuel tank protector (A).

11. Remove the right parking brake cable mounting bolts (see page 19-42).
12. Place a jack or other support under the fuel tank (B).
13. Remove the strap bolts (C) and the straps (D).
14. Remove the fuel tank.
15. Install the parts in the reverse order of removal.
NOTE: - New fuel tanks have a ring pull (E) at the fuel vapor hose connector (F). When you connect the hose and confirm that the connection is secure, remove the ring pull by pulling it down.
- Before connecting the fuel fill pipe and the quick-connect fitting, check for dirt, and clean them if needed, taking care not to damage the fuel fill pipe and other parts.
- When installing the fuel tank protector, make sure to insert it into the clip (G) in the direction shown.
 Fuel Pump/Fuel Gauge Sending Unit
Replacement
Fuel Pump/Fuel Gauge Sending Unit
Replacement
1. Remove the fuel tank unit (see page 11 -320).
2. Remove the fuel level sensor (fuel gauge sending
unit) (A) from the fuel tank unit (B).
3. Check these items before installing the fuel tank ...
 Fuel Fill Pipe Removal/Installation
1. Drain the fuel tank (see page 11-309).
2. Remove the fuel fill cap.
3. Remove the left rear wheel.
4. Remove the fuel fill pipe cover (A).
5. Disconnect the quick-connect fittings (A) ( ...
See also:
VTC Oil Control Solenoid Valve
Removal/Test/lnstallation
1 Disconnect the VTC oil control solenoid valve 2P
connector (A).
2. Remove the bolt (B) and the VTC oil control solenoid
valve (C).
3. Connect VTC oil control valve 2P connector terminal
No. ...
Symptom Troubleshooting Index
When the vehicle has one of these symptoms, check for a diagnostic trouble
code (DTC) with the HDS. If there is no DTC,
do the diagnostic procedure for the symptom, in the sequence listed, until yo ...
Training HomeLink
Before you begin - If you just
received your vehicle and have not
trained any of the buttons in
HomeLink before, you should erase
any previously learned codes before
training the first butto ...