 Honda Accord: Alternator Removal and
Installation
Honda Accord: Alternator Removal and
Installation
Removal
1. Do the battery terminal disconnection procedure (see page 22-91).
2. Remove the drive belt (see page 4-30).
3. Remove the two bolts securing the alternator.
4. Disconnect the alternator connector (A) and the positive alternator cable (B), and remove the harness clamp (C), then remove the alternator.

Installation
1. Install the alternator, then connect the alternator connector (A) and the positive alternator cable (B), and install the harness clamp (C). Make sure the crimped side of the ring terminal faces away from the alternator when you connect it.
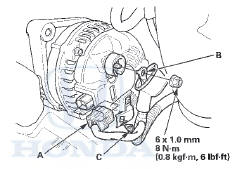
2. Tighten the two bolts securing the alternator.
3. Install the drive belt (see page 4-30).
4. Do the battery terminal reconnection procedure (see page 22-91).
 Tensioner Pulley
Replacement
Tensioner Pulley
Replacement
1. Remove the auto-tensioner (see page 4-31).
2. Clamp the auto-tensioner (A) by using two 8 mm bolts
(B) and a vise (C) as shown. Do not clamp the
auto-tensioner itself, then remove the tensione ...
 Alternator Overhaul
Exploded View
Special Tools Required
- Driver Handle, 15 x 135L 07749-0010000
- Bearing Driver Attachment, 42 x 47 mm 07746-0010300
NOTE: Refer to the Exploded View as needed during this
proced ...
See also:
Cylinder Head
Component Location Index (cont'd)
Engine Compression Inspection
NOTE: After this inspection, you must reset the engine
control module (ECM)/powertrain control module
(PCM), otherwise the ECM ...
Disc Changer Error Messages (Models without navigation system)
The chart on the right explains the
error messages you may see in the
display while playing a disc.
If you see an error message in the
display while playing a disc, press
the eject button. Af ...
Deleting all HDD Data
Reset all the menu and customized settings, and delete all music data on the
HDD.
1. Turn on the audio system and select the
HDD mode.
2. Press the SETTINGS button.
3. Rotate to select Aud ...