 Honda Accord: Fuel Pressure Relieving
Before disconnecting fuel lines or hoses, relieve pressure from the system by disabling the fuel pump, running the engine until it stalls, then and disconnecting the fuel line/quick connect fitting in the engine compartment.
With the HDS
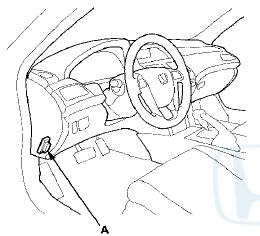
1. Connect the HDS to the data link connector (DLC) (A) located under the driver's side of the dashboard.
2. Turn the ignition switch to ON (II).
3. Make sure the HDS communicates with the ECM/PCM. If it doesn't, go to the DLC circuit troubleshooting (see page 11-181).
4. Turn the ignition switch to LOCK (0).
5. Remove the fuel fill cap to relieve the pressure in the fuel tank.
6. Turn the ignition switch to ON (II).
7. From the INSPECTION MENU of the HDS, select Fuel Pump OFF, then start the engine, and let it idle until it stalls.
NOTE: - Do not allow the engine to idle above 1,000 rpm or the ECM/PCM will continue to operate the fuel pump.
- Pending or Confirmed DTC may be set during this procedure. Check for DTCs, and clear them as needed (see page 11-4).
8. Turn the ignition switch to LOCK (0).
9. Do the battery terminal disconnection procedure (see page 22-91).
10. Remove the quick-connect fitting cover (A) (see page 11-314).
11. Check the fuel quick-connect fitting for dirt, and clean it if needed.
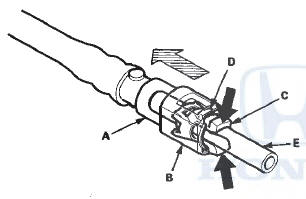
12. Place a rag or shop towel over the quick-connect fitting (A).

13. Disconnect the quick-connect fitting (A): Hold the connector (B) with one hand, and squeeze the retainer tabs (C) with the other hand to release them from the locking tabs (D). Pull the connector off.
NOTE: - Be careful not to damage the line (E) or other parts.
- Do not use tools.
- If the connector does not move, keep the retainer tabs pressed down, and alternately pull and push the connector until it comes off easily.
- Do not remove the retainer from the line; once removed, the retainer must be replaced with a new one.
14. After disconnecting the quick-connect fitting, check it for dirt or damage (see step 5 on page 11 -315).
15. Do the battery terminal reconnection procedure (see page 22-91).
Without the HDS
1. Remove the driver's dashboard lower cover (see page 20-166).
2. Remove PGM-FI main relay 2 (FUEL PUMP) (A) from the driver's under-dash fuse/relay box.
3. Start the engine, and let it idle until it stalls.
NOTE: If any DTCs are stored, clear and ignore them.
4. Turn the ignition switch to LOCK (0).
5. Remove the fuel fill cap to relieve the pressure in the fuel tank.
6. Do the battery terminal disconnection procedure (see page 22-91).
7. Remove the quick-connect fitting cover (A) (see page 11-314).
8. Check the fuel quick-connect fitting for dirt, and clean it if needed.
9. Place a rag or shop towel over the quick-connect fitting (A).
10. Disconnect the quick-connect fitting (A): Hold the connector (B) with one hand, and squeeze the retainer tabs (C) with the other hand to release them from the locking tabs (D). Pull the connector off.
NOTE: - Be careful not to damage the line (E) or other parts.
- Do not use tools.
- If the connector does not move, keep the retainer tabs pressed down, and alternately pull and push the connector until it comes off easily.
- Do not remove the retainer from the line; once removed, the retainer must be replaced with a new one.
11. After disconnecting the quick-connect fitting, check it for dirt or damage (see step 5 on page 11-315).
12. Do the battery terminal reconnection procedure (see page 22-91).
 Fuel Pump Circuit Troubleshooting
If you suspect a problem with the fuel pump, check that
the fuel pump actually runs; when it is on, you will hear
some noise if you listen to the fuel fill port with the fuel
fill cap removed. The ...
 Fuel Pressure Test
Special Tools Required
- Fuel Pressure Gauge 07406-004000B
- Fuel Pressure Gauge Attachment Set 07AAJ-S6MA150
1. Relieve the fuel pressure (see page 11-306).
2. Attach the fuel pressure gauge se ...
See also:
Rear License Plate Light Bulbs
When replacing, use the following bulbs.
1. Remove the license plate light assembly by
pushing the left edge of the lens toward the
right and pulling the assembly out.
2. Remove the lens b ...
Audio System Basic Operation
To use the audio system function, the ignition switch must be in ACCESSORY
or
ON
Use the selector knob or MENU button to
access some audio functions.
Press to switch between the
normal ...
Emissions Controls
The burning of gasoline in your
vehicle’s engine produces several byproducts.
Some of these are carbon
monoxide (CO), oxides of nitrogen
(NOx), and hydrocarbons (HC).
Gasoline evaporating fr ...