 Honda Accord: Fuel Pump Circuit Troubleshooting
If you suspect a problem with the fuel pump, check that the fuel pump actually runs; when it is on, you will hear some noise if you listen to the fuel fill port with the fuel fill cap removed. The fuel pump should run for 2 seconds when the ignition switch is turned to ON (II). If the fuel pump does not make noise, check as follows: 1. Turn the ignition switch to LOCK (0).
2. Remove the driver's dashboard lower cover (see page 20-166).
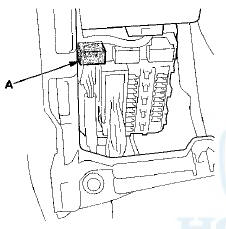
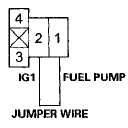
3. Remove PGM-FI main relay 2 (FUEL PUMP) (A) from the driver's under-dash fuse/relay box.
4. Turn the ignition switch to ON (II).
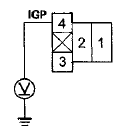
5. Measure the voltage between PGM-FI main relay 2 (FUEL PUMP) 4P connector terminal No. 4 and body ground.
PGM-FI MAIN RELAY 2 (FUEL PUMP) 4P, CONNECTOR
Terminal side of female terminals
Is there battery voltage? YES-
Go to step 14.
NO
-Go to step 6.
6. Turn the ignition switch to LOCK (0).
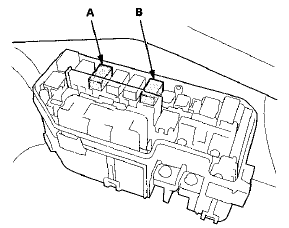
7. Remove PGM-FI main relay 1 (A) and the ETCS control relay (B) from the under-hood fuse/relay box.
8. Jump the SCS line with the HDS.
9. Disconnect ECM/PCM connector A (49P).
10. Disconnect engine wire harness connector C101 at the left side of the engine compartment.
11. Disconnect the driver's under-dash fuse/relay box connector F (33P).
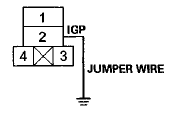
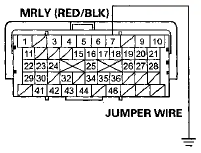
12. Connect PGM-FI main relay 1 4P connector terminal No. 2 to body ground with a jumper wire.
PGM-FI MAIN RELAY 1 4P CONNECTOR
Terminal side of female terminals
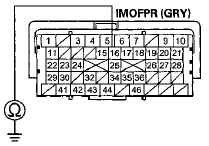
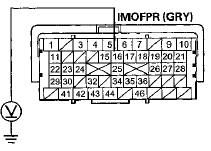
13. Check for continuity between driver's under-dash fuse/relay box connector F (33P) terminal No. 31 and body ground.
DRIVER'S UNDER-DASH hUsE/RELAY BOX CONNECTOR F (33P)
Wire side of female terminals
Is there continuity? YES
-Replace the driver's under-dash fuse/relay box; USA models (see page 22-86), Canafda models (see page 22-87).
NO-
- Repair open in the wire between the under-hood fuse/relay box and the driver's under-dash fuse/relay box.
- If the wire is OK, replace the under-hood fuse/relay box (see page 22-86).
14. Measure the voltage between PGM-FI main relay 2 (FUEL PUMP) 4P connector terminal No. 2 and body ground.
PGM-FI MAIN RELAY 2 (FUEL PUMP) 4P CONNECTOR
Terminal side of female terminals
Is there battery voltage? YES-
Go to step 15.
NO-
- Check the No. 9 FUEL PUMP (20 A) fuse in the driver's under-dash fuse/relay box.
- If the fuse is OK, replace the driver's under-dash fuse/relay box; USA models (see page 22-86), Canada models (see page 22-87).
15. Turn the ignition switch to LOCK (0).
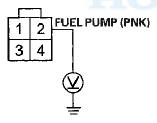
16. Connect PGM-FI main relay 2 (FUEL PUMP) 4P connector terminal No. 3 to body ground with a jumper wire.
PGM-FI MAIN RELAY 2 (FUEL PUMP) 4P CONNECTOR
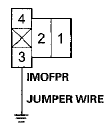
Terminal side of female terminals
17. Jump the SCS line with the HDS.
18. Disconnect ECM/PCM connector A (49P).
19. Check for continuity between body ground and ECM/PCM connector terminal A16.
ECM/PCM CONNECTOR A (49P)
Terminal side of female terminals
Is there continuity? YES
-Go to step 20.
NO
-Repair open in the wire between PGM-FI main relay 2 (FUEL PUMP) and the ECM/PCM (A16).
20. Reinstall PGM-FI main relay 2 (FUEL PUMP).
21. Connect ECM/PCM connector terminal A7 to body ground with a jumper wire.
ECM/PCM CONNECTOR A (49P)
Terminal side of female terminals
22. Turn the ignition switch to ON (II).
23. Measure the voltage between ECM/PCM connector terminal A16 and body ground.
ECM/PCM CONNECTOR A (49P)
Terminal side of female terminals
Is there battery voltage? YES
-Go to step 24.
NO
-Replace PGM-FI main relay 2 (FUEL PUMP).
24. Turn the ignition switch to LOCK (0).
25. Reconnect ECM/PCM connector A (49P).
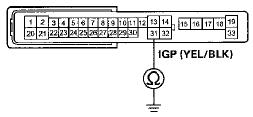
28. Turn the ignition switch to ON (II), and measure the voltage between driver's under-dash fuse/relay box connector F (33P) terminal No. 22 and body ground within 2 seconds.
DRIVER'S UNDER-DASH FUSE/RELAY BOX CONNECTOR F (33P)
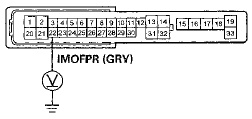
Wire side of female terminals
Is there battery voltage? YES
-Update the ECM/PCM if it does not have the latest software (see page 11 -203), or substitute a known-good ECM/PCM (see page 11-7), then recheck.
If the symptom/indication goes away and the ECM/PCM was updated, troubleshooting is complete.
If the symptom/indication goes away and the ECM/PCM was substituted, replace the original ECM/PCM (see page 11-204).
NO
-Go to step 27.
27. Turn the ignition switch to ON (II), and measure the voltage between driver's under-dash fuse/relay box connector F (33P) terminal No. 22 and body ground after 2 seconds.
DRIVERS UNDER-DASH FUSE/RELAY BOX CONNECTOR F (33P)

Wire side of female terminals
Is there battery voltage? YES
-Go to step 28.
NO-
Replace the driver's under-dash fuse/relay box; USA models (see page 22-86), Canada models (see page 22-87).
28. Turn the ignition switch to LOCK (0).
29. Remove the rear seat cushion (see page 20-241).
30. Remove the access panel from the floor (see page 11-320).
31. Turn the ignition switch to ON (II), and measure the voltage between fuel tank unit 4P connector terminal No. 2 and body ground within 2 seconds.
FUEL TANK UNIT 4P CONNECTOR
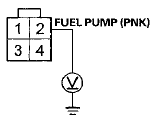
Wire side of female terminals
Is there battery voltage? YES
-Go to step 36.
NO
-Go to step 32.
32. Turn the Ignition switch to LOCK (0).
33. Remove PGM-FI main relay 2 (FUEL PUMP).
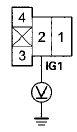
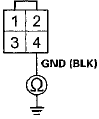
34. Connect PGM-FI main relay 2 (FUEL PUMP) 4P connector terminals No. 1 and No. 2 with a jumper wire.
PGM-FI MAIN RELAY 2 (FUEL PUMP) 4P CONNECTOR
Terminal side of female terminals
35. Turn the ignition switch to ON (II), and measure the voltage between fuel tank unit 4P connector terminal No. 2 and body ground.
FUEL TANK UNIT 4P CONNECTOR
Wire side of female terminals
Is there battery voltage? YES
-Replace PGM-FI main relay 2 (FUEL PUMP).
NO
- - Repair open in the wire between the driver's under-dash fuse/relay box (D10) and the fuel tank unit 4P conneetor.
- If the wire is OK, replace the driver's under-dash fuse/relay box (see page 22-86).
36. Turn the ignition switch to LOCK (0).
37. Check for continuity between fuel tank unit 4P connector terminal No. 4 and body ground.
FUEL TANK UNIT 4P CONNECTOR
Wire side of female terminals
Is there continuity? YES-
Replace the fuel pump (see page 11-324).
NO
-Repair open in the wire between the fuel tank unit 4P connector and G603; 4-door (see page 22-50), 2-door (see page 22-52).
 DTC Troubleshooting
DTC P0461: Fuel Level Sensor (Fuel Gauge
Sending Unit) Circuit Range/Performance
Problem
NOTE:
- Before you troubleshoot record all freeze data and
any on-board snapshot, and review the general
...
 Fuel Pressure Relieving
Before disconnecting fuel lines or hoses, relieve
pressure from the system by disabling the fuel pump,
running the engine until it stalls, then and disconnecting
the fuel line/quick connect fitting ...
See also:
Instruments and Controls
This section gives information about
the controls and displays that
contribute to the daily operation of
your vehicle. All the essential
controls are within easy reach. ...
Power Mirror Replacement
NOTE: Take care not to scratch the door.
1. Lower the door glass fully.
2. With your hand, carefully pull out the top edge of the
tweeter cover (A) to release the upper hooks (B) and
detach th ...
Shift Solenoid Valve Removal and
Installation
NOTE:
-Do not hold the shift solenoid valve connector to
remove and to install the shift solenoid valves. Hold
the shift solenoid valve b o d y .
-Do not install the shift solenoid valve A before ...