 Honda Accord: Fuel Cap Warning Message System
Troubleshooting
Honda Accord: Fuel Cap Warning Message System
Troubleshooting
Special Tools Required
- Vacuum Pump/Gauge, 0 - 3 0 In.Hg, Snap-on YA4000A or equivalent, commercially available
- Vacuum/Pressure Gauge, 0 - 4 In.Hg, 07JAZ-001000B
comes on frequently, or if the message does not go off after the fuel fill cap is tightened and the vehicle is driven several days.
1. Check the fuel fill cap (the cap must say TIGHTEN TO CLICK), it should turn 1/4 after it's tight, then it clicks.
Is the correct fuel fill cap installed and properly tightened? YES-Go to step 2.
NO-Replace or tighten the cap, then go to step 13.
2. Check the fuel fill cap seal (A) and the fuel fill pipe mating surface (B). Verify that the fuel fill cap tether cord (C) is not caught under the cap.
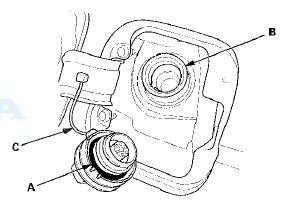
Is the fuel fill cap seal missing or damaged, is the fuel fill pipe damaged, or is the tether cord caught under the cap? YES
-Replace the fuel fill cap or the fuel fill pipe, then go to step 13.
NO
-Go to step 3.
3. Reinstall and tighten the fuel fill cap.
4. Clear the DTC with the HDS.
5. Start the engine. Hold the engine speed at 3,000 rpm without load (A/T in P or N, M/T in neutral) until the radiator fan comes on, then let it idle for 1 minute.
6. Test drive at 45 mph (72 km/h) for 1 minute or more.
Does fuel cap warning message come on? YES
-Go to step 7.
NO
-lntermittent failure, the system is OK at this time.
7. Turn the ignition switch to LOCK (0).
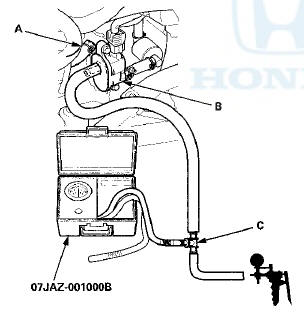
8. Disconnect the vacuum hose (A) from the EVAP canister purge valve (B) in the engine compartment, then connect a T-fitting (C), a vacuum gauge, and a vacuum pump/gauge, 0-30 in.Hg, to the EVAP canister purge valve as shown.
9. Turn the ignition switch to ON (II).
10. Apply about 2 kPa (0.6 inHg, 15 mmHg) of vacuum to the hose.
11. Select the EVAP PCS ON in the INSPECTION MENU with the HDS.
Does the vacuum release immediately? YES
-Check for a blockage in the EVAP canister purge line between the EVAP canister purge valve and the EVAP canister, then go to step 12.
NO
-Replace the EVAP canister purge valve (see page 11-371), then go to step 12.
12. Reconnect all hoses.
13. Turn the ignition switch to ON (II).
14. Reset the ECM/PCM with the HDS.
15. Do the ECM/PCM idle learn procedure (see page 11-293).
16. Start the engine. Hold the engine speed at 3,000 rpm without load (A/T in P or N, M/T in neutral) until the radiator fan comes on, then let it idle for 1 minute.
17. Test-drive at 45 mph (72 km/h) for 1 minute or more.
Does the fuel cap message come on? YES-
Go to step 1 and recheck.
NO
-Troubleshooting is complete.
 DTC Troubleshooting
DTC P0443: EVAP Canister Purge Valve Circuit
Malfunction
Special Tools Required
Vacuum Pump/Gauge, 0 - 3 0 In.Hg, Snap-on YA4000A
or equivalent commercially available
NOTE: Before you troubleshoo ...
 EVAP Canister Replacement
1. Raise the vehicle on a lift.
2. Remove the wheel sensor harness clamps (A)
3. Support the rear subframe with a transmission jack
and a wooden block as shown.
4. Remove the rear subframe m ...
See also:
Fog Light Bulbs*
When replacing, use the following bulbs.
1. Loosen the screw using a Phillips-head
screwdriver.
- Be careful not to rotate the screwdriver
more than one or two times to the left.
...
Door Striker Adjustment
Make sure the door latches securely without slamming
it. If necessary, adjust the striker (A): The striker nuts are
fixed, but the striker can be adjusted slightly up or down,
and in or out.
1. ...
Ignition Coil and Spark Plug
Removal/Installation
1. Remove the ignition coil cover (A).
2. Disconnect the ignition coil connectors (B), then
remove the ignition coils (C).
3. Remove the spark plug and inspect them (see page
4-20).
4. Appl ...