 Honda Accord: Fog Light Bulbs*
When replacing, use the following bulbs.

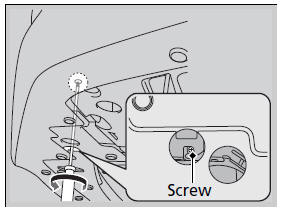

1. Loosen the screw using a Phillips-head
screwdriver.
- Be careful not to rotate the screwdriver
more than one or two times to the left.
The screw may drop down.
NOTICE
Halogen bulbs get very hot when lit. Oil, perspiration, or a scratch on the glass can cause the bulb to overheat and shatter.
The fog lights are halogen bulbs.
When replacing a bulb, handle it by its plastic case, and protect the glass from contact with your skin or hard objects. If you touch the glass, clean it with denatured alcohol and a clean cloth.
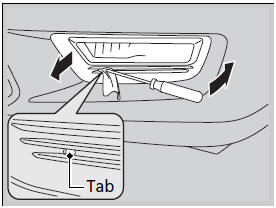
2. Insert a flat-tip screwdriver into the tab on the cover, then pull straight out as indicated to remove the cover.
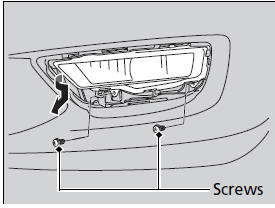
3. Remove the screws using a Phillips-head screwdriver and carefully pull the fog light assembly out of the bumper.

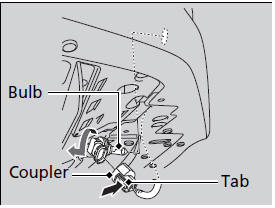
4. Push the tab to remove the coupler.
5. Rotate the old bulb to the left to remove.
6. Insert a new bulb into the fog light
assembly and turn it to the right.
7. Insert the coupler into the connector of the
bulb.
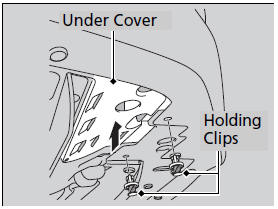

1. Remove the holding clips, then push up the under cover.
2. Push the tab to remove the coupler.
3. Rotate the old bulb to the left to remove.
4. Insert a new bulb into the fog light
assembly and turn it to the right.
5. Insert the coupler into the connector of the
bulb.
 Headlight Bulbs
When replacing, use the following bulbs.
• High Beam Headlight
1. Unlock the holding clips, then remove the
upper part of the air intake duct and the air
intake tube.
2. Push the ta ...
 Front Turn Signal/Side Marker Light Bulbs
When replacing, use the following bulbs.
1. Turn the steering wheel all the way to the
opposite side from the light being replaced.
Passenger side: Turn the steering wheel
to the left.
D ...
See also:
Fuel Line/Quick-Connect Fitting
Removal
NOTE: Before you work on the fuel lines and fittings,
read the Fuel Line/Quick-Connect Fitting Precautions
(see page 11-313).
1. If equipped, remove the quick-connect fitting cover
from the fuel ...
Spark Plug Inspection
1. Remove the ignition coils (see page 4-20).
2. Remove the spark plugs, then inspect the electrodes
and the ceramic insulator.
- Burned or worn electrodes may be caused by these
conditions:
...
Cf Under Head Removal
NOTE:
- Use fender covers to avoid damaging painted
surfaces.
- To avoid damage, unplug the wiring connectors
carefully while holding the connector portion.
- Connect the Honda Diagnostic Sys ...