 Honda Accord: Headlight Bulbs
When replacing, use the following bulbs.

• High Beam Headlight
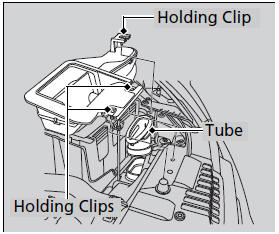

1. Unlock the holding clips, then remove the upper part of the air intake duct and the air intake tube.
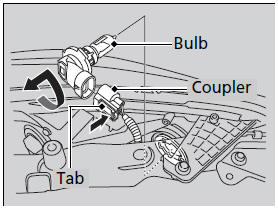
2. Push the tab to remove the coupler.
3. Rotate the old bulb to the left to remove.
4. Insert a new bulb into the headlight
assembly and turn it to the right.
5. Insert the coupler into the connector of the
bulb.
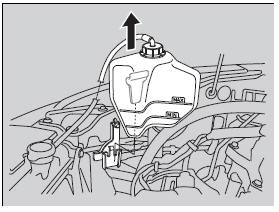
1. Remove the engine coolant reservoir.
NOTICE
Halogen bulbs get very hot when lit.
Oil, perspiration, or a scratch on the glass can cause the bulb to overheat and shatter.
The headlight aim is set by the factory, and does not need to be adjusted. However, if you regularly carry heavy items in the trunk or tow a trailer, have the aiming readjusted at a dealer or by a qualified technician.
When replacing a halogen bulb, handle it by its base, and protect the glass from contact with your skin or hard objects. If you touch the glass, clean it with denatured alcohol and a clean cloth.
The exterior lights' inside lenses (headlights, brake lamps, etc.) may fog temporarily after a car wash or while driving in the rain. This does not impact the exterior light function.
However, if you see a large amount of water or ice accumulated inside the lenses, have your vehicle inspected by a dealer.
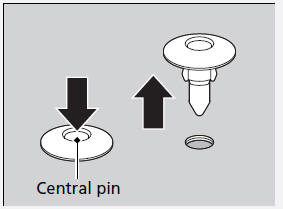
Holding clip
Press down the central pin until it clicks to unlock it.
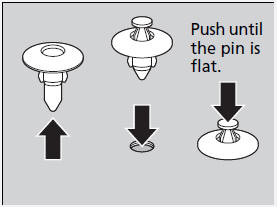
Push the central pin back to lock the clip. Then, insert the clip into the hole and press on the central pin until it is flat.
• Low Beam Headlights

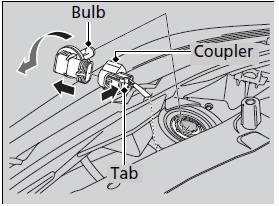
1. Push the tab to remove the coupler.
2. Rotate the old bulb to the left to remove.
3. Insert a new bulb into the headlight
assembly and turn it to the right.
4. Insert the coupler into the connector of the
bulb.

Low beam headlight bulbs are LED type. Have an authorized Honda dealer inspect and replace the light bulbs.

 Fog Light Bulbs*
When replacing, use the following bulbs.
1. Loosen the screw using a Phillips-head
screwdriver.
- Be careful not to rotate the screwdriver
more than one or two times to the left.
...
See also:
All ChildrenMust Be Restrained
Each year, many children are injured
or killed in vehicle crashes because
they are either unrestrained or not
properly restrained. In fact, traffic
collisions are the number one cause
of dea ...
Parking
Always use the parking brake when
you park your vehicle. Make sure
the parking brake is set firmly, or
your vehicle may roll if it is parked
on an incline.
If your vehicle has an automatic
...
General Troubleshooting
Information
Mow to Check for DTCs with the HDS
NOTE: Check the vehicle battery condition first {see page 22-90).
1. Make sure the ignition switch is turned to LOCK (0).
2. Connect the HDS to the data link ...