 Honda Accord: Front Turn Signal/Side Marker Light Bulbs
When replacing, use the following bulbs.

1. Turn the steering wheel all the way to the opposite side from the light being replaced.
Passenger side: Turn the steering wheel
to the left.
Driver side: Turn the steering wheel to the
right.
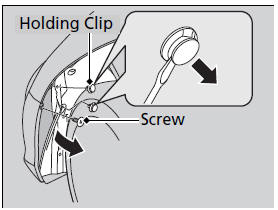
2. Remove the holding clips and screw, and
pull the inner fender back.
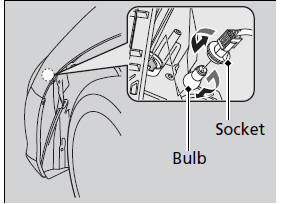
3. Turn the socket to the left and remove it.
4. Push in the old bulb, rotate to the left until
it unlocks, and remove.
5. Insert a new bulb.
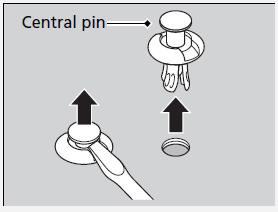
Insert a flat-tip screwdriver, lift and remove the central pin to remove the clip.
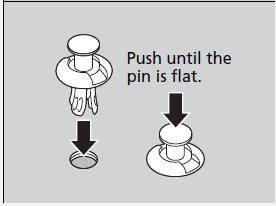
Insert the clip with the central pin raised, and push until it is flat.
 Fog Light Bulbs*
When replacing, use the following bulbs.
1. Loosen the screw using a Phillips-head
screwdriver.
- Be careful not to rotate the screwdriver
more than one or two times to the left.
...
 Side Turn Signal/Emergency Indicator Light Bulbs*
Door mirrors have the side turn lights. Have an authorized Honda dealer
inspect and
replace the light bulbs.
...
See also:
DTC Troubleshooting
DTC 81152: Gauge Control Module (EEPROM)
Error
NOTE: If you are troubleshooting multiple DTCs, be sure
to follow the instructions in B-CAN System Diagnosis
Test Mode A (see page 22-134).
1. Cle ...
Auto Door Locking/Unlocking
Your vehicle locks and unlocks all doors automatically when a certain
condition is
met.
• Auto Door Locking
• Drive lock mode
All doors lock when the vehicle’s speed reaches about 10 mph ...
ECM/PCM Idle Learn Procedure
The idle learn procedure must be done so the ECM/PCM
can learn the engine idle characteristics.
Do the idle learn procedure whenever you do any of
these actions:
- Replace ECM/PCM.
...