 Honda Accord: Front Seat Slide Motor Replacement
SRS components are located in this area. Review the SRS component locations, 2-door (see page 24-23), 4-door (see page 24-21) and the precautions and procedures (see page 24-25) before doing repairs or service.
Driver's Seat (10-way Power Seat)
NOTE; - Put on gloves to protect your hands.
- Take care not to tear or damage the seat covers.
1. Remove the front seat (see page 20-194).
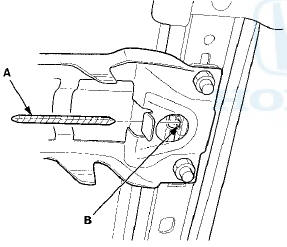
2. Remove the flex cable (A) and the cable housing (B).
-1. Release the housing from the hooks (C).
-2. Disconnect the cable from the worm gear (D) in the -3. Disconnect the cable from the slide motor (E).
NOTE: Take care not to kink the cable.
3. Disconnect the slide motor connector (A), then remove the slide motor (B) from the slide motor bracket (C) while disconnecting the motor from the short flex cable (D).
4. Pull out the short flex cable (A) from the worm gear (B) in the outer seat track.
5. Remove t h e m o t o r end m o u n t i n g (A) f r om the slide m o t o r (B).
6. Install the slide motor in the reverse order of removal, and note these items; - Apply multipurpose grease to the worm gear areas in both seat tracks.
- Install the short flex cable to the slide motor before installing the slide motor to the slide motor bracket.
- Make sure both seat tracks are all the way forward before installing the slide motor bracket on the tracks. Install the short flex cable to the slide motor.
- Make sure the short flex cable and the flex cable are connected properly.
- Make sure the slide motor connector is plugged in properly.
-Check the front seat slide operation.
 Front Seat Lumbar Support
Replacement
Front Seat Lumbar Support
Replacement
2-door Driver's Seat
SRS components are located In this area. Review the
SRS component locations (see page 24-23) and the
precautions and procedures (see page 24-25) before
doing repairs or servic ...
 Front Seat Slide Lever Replacement
Driver's seat (manual height adjustable
seat)/passenger's seat
NOTE:
- Put on gloves to protect your hands.
- Take care not to tear or damage the seat covers.
1. Remove the front seat {see pa ...
See also:
If the Charging System IndicatorComes On
• Reasons for the indicator to come on
Comes on when the battery is not being charged.
• What to do when the indicator comes on
Turn off the heating and cooling system* /climate control syste ...
Maintenance Main Items
If message "SERVICE" does not appear more than 12 months after the display is
reset change the engine oil every year.
NOTE:
- Independent of the maintenance messages in the smart maint ...
Rocker Arm Oil Pressure Switch
Removal/Installation
All models except PZEV
1. Disconnect the rocker arm oil pressure switch
connector (A).
2. Remove the rocker arm oil pressure switch (B).
3. Install the parts in the reverse order of removal wi ...