 Honda Accord: Front Inner Fender Replacement
NOTE: - Put on gloves to protect your hands.
- Take care not to scratch the body.
- When prying with a flat-tip screwdriver, wrap it with protective tape to prevent damage.
1. Remove the front wheel.
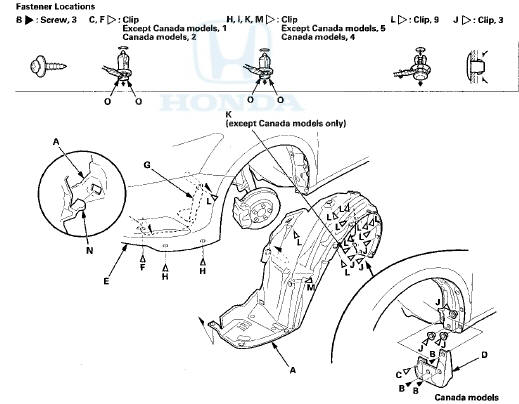
2. Remove the front inner fender (A).
-1. Canada models: On the back of the wheel arch, remove the screws (B) and the clip (C), and remove the front splash guard (D).
-2. From under the front bumper (E), detach the clip (F) securing the front bumper, the splash shield (G), and the front inner fender, and detach the clips (H) securing the front bumper and the inner fender.
-3. From the wheel arch, detach the clips (I, J , K, L) that secure the front inner fender (and the splash shield) to the body.
-4. From the wheel arch, detach the clip (M) that secure the front inner fender to the resonator chamber (left side) or the body (right side).
-5. Release the hook (N) of the splash shield, then remove the front inner fender.
NOTE: To release the clip C, F, H, I, K, M, pry up on the center pin at the notch ( 0 ).
3. Install the inner fender in the reverse order of removal, and note these items: - If the clips are damaged or stress-whitened, replace them with new ones.
- Push the clips and the hook into place securely.
 Fenderwell
...
 Front Splash Shield Replacement
NOTE:
- Put on gloves to protect your hands.
- Take care not to scratch the body.
- When prying with a flat-tip screwdriver, wrap it with protective tape to
prevent damage.
- 4-door is sho ...
See also:
Power Window Master Switch Input
Test
NOTE: Before testing, troubleshoot the multiplex Integrated control unit
first, using B-CAN System Diagnosis Test Mode
A (see page 22-134).
1. Turn the ignition switch to LOCK (0), open and clos ...
Engine Removal
Special Tools Required
. Universal Lifting Eyelet 07AAK-SNAA120
Engine Hanger Adapter VSB02C000015*
- Engine Support Hanger, A and Reds AAR-T1256*
- Subframe Adapter VSB02C000016*
*Available thro ...
Fuel Cap Adapter Replacement
NOTE:
- Put on gloves to protect your hands.
- Take care not to scratch the body.
1. Remove the fuel pipe protector (see page 20-294).
2. Remove the fuel cap (A) by turning it
counterclockw ...