 Honda Accord: Front Splash Shield Replacement
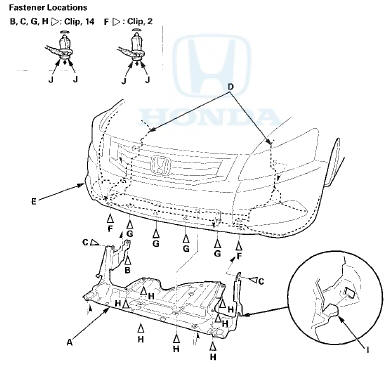
NOTE: - Put on gloves to protect your hands.
- Take care not to scratch the body.
- When prying with a flat-tip screwdriver, wrap it with protective tape to prevent damage.
- 4-door is shown; 2-door is similar.
1. Remove the front wheel.
2. Remove the front splash shield (A).
-1. Detach the clip (B) that secures the front splash shield to the body.
-2. Detach the clips (C) that secure the front inner fender (D) and the front splash shield to the body.
-3. From under the front bumper (E), detach the clips (F) that secure the front bumper, the front inner fender, and the front splash shield to the body.
-4. From under the front bumper, detach the clips (G) that secure the front bumper and the front splash shield to the body.
-5. From under the body, detach the clips (H) that secure the front splash shield to the front subframe.
-6. Release the hooks (I) of the front splash shield, then pull out the splash shield.
NOTE: To release the clips, pry up on the center pin at the notch (J).
3, Install the splash shield in the reverse order of removal, and note these items: - If the clips are damaged or stress-whitened, replace them with new ones.
- Push the clips and the hooks into place securely.
 Front Inner Fender Replacement
NOTE:
- Put on gloves to protect your hands.
- Take care not to scratch the body.
- When prying with a flat-tip screwdriver, wrap it with protective tape to
prevent damage.
1. Remove the f ...
 Front Fender Fairing Replacement
For Some Models
NOTE;
- Take care not to scratch the body.
- Put on gloves to protect your hands.
1. Remove the front Inner fender as needed (see page
20-290).
2. From the wheel arch, rele ...
See also:
TPMS (Tire Pressure Monitoring System)
Instead of directly measuring the pressure in each tire, the TPMS on this
vehicle
monitors and compares the rolling radius and rotational characteristics of each
wheel and tire while you are dri ...
Console Accessory Power Socket
Test/Replacement
NOTE: If all of the front and console accessory power
sockets do not work, check the No. 1 8 (7.5 A) fuse in the
driver's under-dash fuse/relay box and ground (G503)
first.
1. Remove the center ...
Cleaning the Seat Belts
If your seat belts get dirty, use a soft
brush with a mixture of mild soap
and warm water to clean them. Do
not use bleach, dye, or cleaning
solvents. Let the belts air dry before
you use ...