
 Honda Accord: Front Fender Fairing Replacement
For Some Models
NOTE; - Take care not to scratch the body.
- Put on gloves to protect your hands.
1. Remove the front Inner fender as needed (see page 20-290).
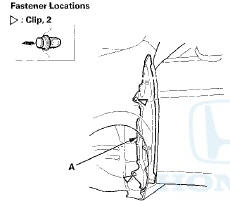
2. From the wheel arch, release the clips fastening the front fender fairing (A).
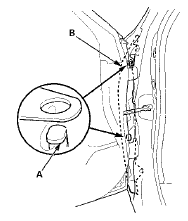
3. Open the front door. Release the hooks (A) fastening the front fender fairing (B).
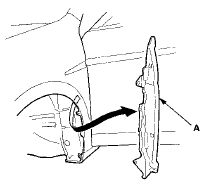
4. Remove the front fender fairing (A).
5. Install the fender fairing in the reverse order of removal, and note these items: - If the clips are damaged or stress-whitened, replace them with new ones.
- Push the clips and the hooks into place securely
 Front Splash Shield Replacement
NOTE:
- Put on gloves to protect your hands.
- Take care not to scratch the body.
- When prying with a flat-tip screwdriver, wrap it with protective tape to
prevent damage.
- 4-door is sho ...
 Middle Floor Undercover
Replacement
Middle Floor Undercover
Replacement
Left Side
NOTE:
- Put on gloves to protect your hands.
- Take care not to scratch the body.
1. Remove the bolts and release the hook (A), then
remove the left middle floor undercover (B).
...
See also:
A/T Clutch Pressure Control Solenoid
Valve A Test
1. Connect the HDS to the DLC (A) located under the
driver's side of the dashboard.
2. Turn the ignition switch to ON (II). Make sure the HDS
communicates with the PCM. If it does not, go to the
...
DTC Troubleshooting
PTC 11 -1x { " x " can be 0 ,2 thru 3 or A thru F):
Open io the Driver's Airbag First Inflator
DTC 11-4x ("x" can be 0,2 thru 9 or A thru F):
Open in the Driver's Airbag Second ...
Transmission Housing
Shaft Assembly and Housing
Installation
Exploded View
NOTE: Refer to the Exploded View as needed during the
following procedure.
1. Install the differential assembly in the torque
converter ...