
 Honda Accord: Defaulting All the Settings
Reset all the menu and customized settings as the factory defaults.
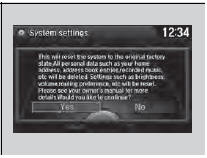
1. Press the SETTINGS button.
2. Rotate  to select System
Settings, then
press
to select System
Settings, then
press  .
.
3. Rotate  to select Factory data
reset,
then press
to select Factory data
reset,
then press  .
.
- The pop-up menu appears on the screen.
4. Rotate  to select Yes,
then press
to select Yes,
then press  .
.
- The confirmation message will appear.
5. Rotate  to select Yes,
then press
to select Yes,
then press  again to reset the settings.
- The confirmation message will appear.
Press  to select OK.
When you transfer the vehicle to a third party, reset all settings to default and delete all personal data.
The following settings will be reset:
• Routing & Guidance: Rerouting, Unverified Area
Routing, Traffic Rerouting, Edit Waypoint Search
Area, Guidance Mode, Street Name Guidance
• Route Preference

 Defaulting All the Settings
Reset all the menu and customized settings as the factory defaults.
1. Press the SETTINGS button.
1. Press and hold the DISP button.
2. Rotate to select System
Settings, then
press .
...
 Deleting all HDD Data
Reset all the menu and customized settings, and delete all music data on the
HDD.
1. Turn on the audio system and select the
HDD mode.
2. Press the SETTINGS button.
3. Rotate to select Aud ...
See also:
Shift Solenoid Valve Removal and
Installation
NOTE:
-Do not hold the shift solenoid valve connector to
remove and to install the shift solenoid valves. Hold
the shift solenoid valve b o d y .
-Do not install the shift solenoid valve A before ...
Under-hood Fuse/Relay Box
Removal and Installation
Special Tools Required
Relay Puller 07AAC-000A1A0
NOTE; The under-hood fuse/relay box is a part of the left
engine compartment wire harness, and it cannot be
replaced by ...