 Honda Accord: Dashboard Center Vent
Removal / Installation
Honda Accord: Dashboard Center Vent
Removal / Installation
Special Tools Required
KTC Trim Tool Set SOJATP2014*
*Available through the Honda Tool and Equipment Program; call 888-424-6857
With Navigation Sf stem
NOTE: - Take care not to scratch the dashboard or the related parts.
- Use the appropriate tool from the KTC trim tool set to avoid damage when removing components.
1. Apply protective tape (A) to the dashboard middle pad beside both side edges of the dashboard center vent (B). Pry up on the edge of the center vent with the appropriate trim tool to detach the clips (C, D).
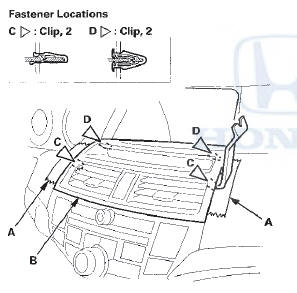
2. Pull out the dashboard center vent (A) by hand to detach lower clips and release the projections (B) from the holes in the center display visor (C), then remove the center vent.
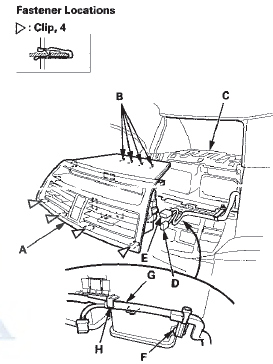
3. Disconnect the hazard warning switch/passenger's airbag cutoff indicator connector (D) and the navigation subdisplay connector (E). Detach the harness clip (F), and release the wire harness (G) from the harness holder (H).
4. Install the center vent in the reverse order of removal, and note these items: - If the clips are damaged or stress-whitened, replace them with new ones.
- Make sure each connector is plugged in properly.
- Push the harness clip and the clips into place securely.
 Dashboard Side Vent
Removal/Installation
Dashboard Side Vent
Removal/Installation
Special Tools Required
KTC Trim Tool Set SOJATP2014*
* Available through the Honda Tool and
Equipment
Program; call 888-424-6857
NOTE;
- Take care not to scratch the dashboard or the related
p ...
 Side Defogger Vent Trim
Removal/Installation
Side Defogger Vent Trim
Removal/Installation
Special Tools Required
KTC Trim Tool Set SOJATP2014*
* Available through the Honda Tool and
Equipment
Program; call 888-424-6857
Driver's Side
NOTE:
- Take care not to scratch the dashboard or ...
See also:
VTC Oil Control Solenoid Valve
Removal/Test/lnstallation
1 Disconnect the VTC oil control solenoid valve 2P
connector (A).
2. Remove the bolt (B) and the VTC oil control solenoid
valve (C).
3. Connect VTC oil control valve 2P connector terminal
No. ...
Opening/Closing theWindows and Moonroof with the Key
You can open and close the windows
and the moonroof (if equipped) with
the key in the driver’s door lock.
To open:
1. Insert the key in the driver’s door
lock.
2. Turn the key clockwise ...
Replacing a Front Turn Signal/Parking Light Bulb
1. Open the hood.
To change the turn signal bulb on
the passenger’s side, remove the
engine coolant reserve tank by
pulling it out of its stay.
Driver’s side on V6 models
Remove t ...