 Honda Accord: Dashboard/Steering Hanger Beam
Disassembly/Reassembly
Honda Accord: Dashboard/Steering Hanger Beam
Disassembly/Reassembly
Special Tools Required
KTC Trim Tool Set SOJATP2014*
*Available through the Honda Tool and Equipment Program; call 888-424-6857
NOTE: - Put on gloves to protect your hands.
В© Take care not to scratch the dashboard, the body, or the related parts.
- Take care not to bend the brackets.
- Use the appropriate tool from the KTC trim tool set to avoid damage when removing components.
1. Remove the dash boa rd/steeri ng hanger beam (see page 20-183).
2. Remove these items from the dashboard: - Instrument visor (see page 20-165) - Center pocket: - Without navigation system (see page 20-168) - With navigation system (see page 20-169) - Driver's outer dashboard trim (see page 20-167) - Driver's inner dashboard trim (see page 20-167) - Dashboard side vent, both sides (see page 20-177) - Driver's side defogger vent trim (see page 20-179) - Passenger's dashboard trim (see page 20-173) - Passenger's dashboard side panel (see step 6 on page 20-175) - Gauge control module (see page 22-351) m Sunlight sensor, with climate control (see page 21-186) - In-car temperature sensor, with climate control (see page 21-184) - Audio disk changer, with navigation system (see page 23-118) - Front passenger's airbag (see page 24-212)
3. With navigation system: Remove the bolts, then remove the center pocket frame (A) from the dashboard.
4. Remove these items from the dashboard: - Center display visor: ~ Without navigation system (see page 20-171) - With navigation system (see page 20-172) - Audio-HVAC module: - Without navigation system (see page 23-115) - With navigation system (see page 23-114) - Audio-HVAC display: - Without navigation system (see page 23-119) - With navigation system (see page 23-118)
Driver's side
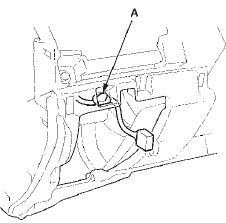
5. Detach the harness clip (A) from the dashboard.
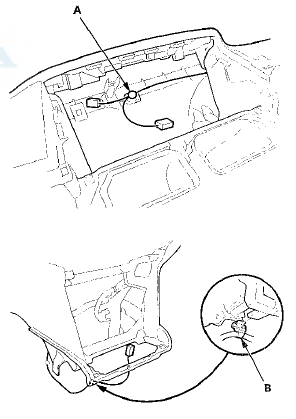
Center dashboard
6. Detach the harness clip (A) from the dashboard duct, and release the harness holder (B) from the dashboard.
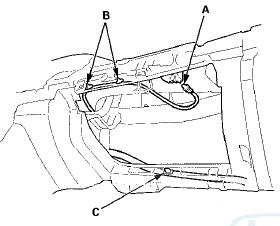
Passenger's side
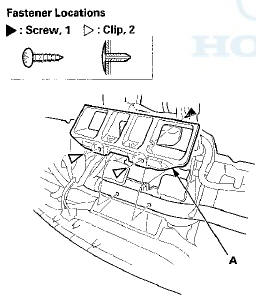
7. Disconnect the glove box light bulb socket (A), and detach the harness clips (B) from the dashboard duct.
Detach the harness clip (C) from the dashboard.
8. Remove the screw and detach the clips, then remove the dashboard center duct (A).
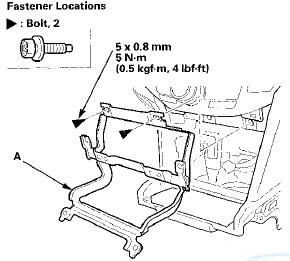
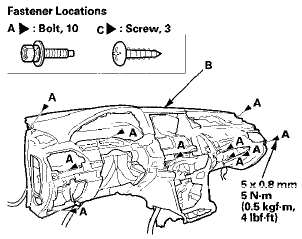
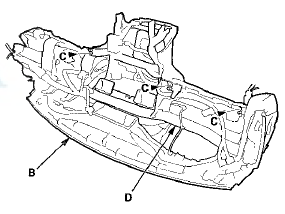
9. Remove the bolts (A) from the front of the dashboard (B), and remove the screws (C) from the back of the dashboard, then separate the dashboard from the steering hanger beam (D).
10. Assemble the dashboard and the steering hanger beam in the reverse order of disassembly, and note these items: - If the clips are damaged or stress-whitened, replace them with new ones.
- Make sure the dashboard wire harness is not pinched.
- Make sure the glove box light bulb socket is connected properly.
- Push the harness clips and the harness holder into place securely.
 Dashboard/Steering Hanger Beam
Removal/Installation
Dashboard/Steering Hanger Beam
Removal/Installation
Special Tools Required
KTC Trim Tool Set SOJATP2014*
*Available through the Honda Tool and Equipment
Program; call 888-424-6857
SRS components are located in this area. Review the
SRS component l ...
 Seats
Seats
...
See also:
Symptom Troubleshooting
Immobilizer Indicator blinks
NOTE; Before troubleshooting, check the Items listed In
"General Check before Troubleshooting".
1. Turn the ignition switch to LOCK (0).
2. Connect the H ...
Navigation Unit
Removal/Installation
NOTE:
• Before you replace the navigation unit, back-up the
customer data using system diagnostic mode Save
Users Memory under the Functional Set up (see page
23-186).
• Ifthe navigat ...
Fuel Economy
Actual Mileage and EPA Fuel
Economy Estimates Comparison.
Fuel economy is not a fixed number.
It varies based on driving conditions,
driving habits, and vehicle condition.
Therefore, it is not ...