
 Honda Accord: Clutch Wave-plate Phase Difference
Inspection
Honda Accord: Clutch Wave-plate Phase Difference
Inspection
1. Place the clutch wave-plate (A) on a surface plate, and set a dial indicator (B) on the wave-plate.
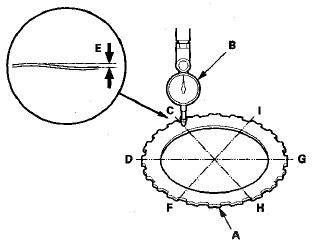
2. Find the bottom (C) of a phase difference of the wave-plate, zero the dial indicator and make a reference mark on the bottom of the wave-plate.
3. Rotate the wave-plate about 60-degrees apart from the bottom while holding the wave-plate by its circumference. The dial indicator should be at the top (D) of a phase difference. Do not rotate the wave-plate while holding its surface, always rotate it while holding its edges.
4. Read the dial indicator. The dial indicator reads the phase difference (E) of the wave-plate between bottom and top.
Standard Phase Difference:
1st Clutch: 0.15-0.25 mm (0.006-0.010 in)
2nd Clutch: 0.10-0.20 mm (0.004-0.008 in)
3rd Clutch: 0.10-0.20 mm (0.004-0.008 in)
4th Clutch: 0.10-0.20 mm (0.004-0.008 in)
5th Clutch: 0.10-0.20 mm (0.004-0.008 in)
5. Rotate the wave-plate about 60-degrees. The dial indicator should be at the bottom of a phase difference (F and G), and zero the dial indicator.
6. Measure the phase difference at the other two tops (H and I) of the wave-plate by following steps 3 thru 5.
7. If two of the three measurements are within the standard, the wave-plate is OK. If two of the three measurements are out of the standard, replace the wave-plate.
 Clutch Inspection
1. Inspect the 4th and 5th clutch pistons and the clutch
piston check valves (A).
2. If the clutch piston check valve is loose or damaged,
replace the clutch piston.
3. Check the spring retain ...
 Clutch Clearance Inspection
Special Tools Required
Clutch Compressor Attachment 07ZAE-PRP0100
1. Inspect the clutch piston, the clutch discs, the clutch
plates, and the clutch end-plate for wear and damage
(see page 14-303), ...
See also:
Frame Repair Chart
Top View
g2 Front floor locating hole 025 (0.98) rear
h2 Front floor tunnel frame locating hole 013 (0.51) rear
i Rear frame A locating hole 025 (0.98)
j Rear floor locating hole 025 (0.98)
k1 ...
Transmitter Test
NOTE:
• If the doors unlock or lock with the
transmitter, but the
LED on the transmitter does not come on, the LED is
faulty; replace the transmitter.
• If any door is open, you cann ...
Tire Labeling
The tires that came on your vehicle
have a number of markings. Those
you should be aware of are described
below.
Tire Size
Whenever tires are replaced, they
should be replaced with tires o ...