 Honda Accord: Clutch Inspection
1. Inspect the 4th and 5th clutch pistons and the clutch piston check valves (A).
2. If the clutch piston check valve is loose or damaged, replace the clutch piston.
3. Check the spring retainer for wear and damage.
4. If the spring retainer is worn or damaged, replace it.
5. Check the oil seal (A) on the spring retainer of the 1st, 2nd, and 3rd clutches for wear, damage, and peeling.
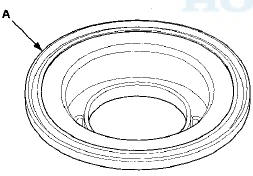
6. If the oil seal is worn, damaged, or peeling, replace the spring retainer.
7. Inspect the clutch discs, the clutch plates, and the clutch end-plate for wear, damage, and discoloration.
Clutch Discs for All Models
Standard Thickness: 1.94 mm (0.076 in)
Clutch Plates
Standard Thickness:
1 st Clutch Wave-plates: 1.6 mm (0.063 in) Flat-plates: 1.6 mm (0.063 in)
2nd Clutch Wave-plates: 2.0 mm (0.079 in) Flat-plate: 2.0 mm (0.079 in)
3rd Clutch Wave-plates: 1.6 mm (0.063 in) Flat-plates: 1.6 mm (0.063 in)
4th Clutch (wave-plates): 2.0 mm (0.079 in)
5th Clutch (wave-plates): 2.0 mm (0.079 in)
8. If the clutch discs are worn or damaged, replace them as a set. If the clutch discs are replaced, do the clutch clearance inspection (see page 14-304).
9. If any clutch plate is worn, damaged, or discolored, replace the damaged plate with a new plate, and inspect the other wave-plates for a phase difference (see page 14-304). If the clutch plate is replaced, do the clutch clearance inspection (see page 14-304).
10. If the clutch end-plate is worn, damaged, or discolored, do the clutch clearance inspection (see page 14-304), then replace the clutch end-plate.
 Clutch Disassembly
Special Tools Required
Clutch Spring Compressor Set 07LAE-PX40000
1. Remove the snap ring using a screwdriver.
2. Remove the clutch end-plate (A), the clutch discs (B)
(5), the clutch wave-plate ...
 Clutch Wave-plate Phase Difference
Inspection
Clutch Wave-plate Phase Difference
Inspection
1. Place the clutch wave-plate (A) on a surface plate, and
set a dial indicator (B) on the wave-plate.
2. Find the bottom (C) of a phase difference of the
wave-plate, zero the dial indicator an ...
See also:
Brake Fluid Level Switch Test
NOTE: If both the ABSA/SA indicator and the brake
system indicator come on at the same time, check the
VSA system for DTCs first (see page 19-48).
1. Disconnect the brake fluid level switch conne ...
Dashboard Center Vent
Removal / Installation
Special Tools Required
KTC Trim Tool Set SOJATP2014*
*Available through the Honda Tool and Equipment
Program; call 888-424-6857
With Navigation Sf stem
NOTE:
- Take care not to scratch the dashb ...
Function Test
NOTE;
• With climate control: Before testing, troubleshoot the
B-CAN System Diagnosis Test Mode A (see page
22-134).
• Before testing, check the No. 4 (40 A) fuse in the
under-hood fu ...