 Honda Accord: Center Console Rear Trim
Removal/Installation
Honda Accord: Center Console Rear Trim
Removal/Installation
Special Tools Required
KTC Trim Tool Set SOJATP2014*
*Available through the Honda Tool and Equipment Program; call 888-424-6857
NOTE: - Take care not to scratch the center console and the related parts.
- Use the appropriate tool from the KTC trim tool set to avoid damage when removing components.
1. Gently pull out the center console rear trim (A) to detach the clips, then remove the trim.
Without rear ventilation
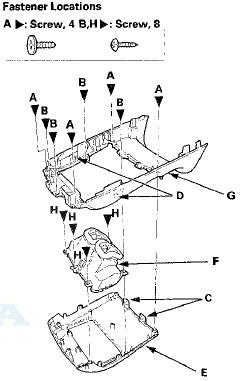
2. With rear ventilation: Disassemble the center console rear t r i m.
-1. Remove t h e screws (A,B), release t h e hooks (C) a n d t h e tabs (D), t h e n remove t h e upper t r im (E) and t he rear vent (F) as an assembly from the lower trim (G).
-2. Remove t h e screws (H), then separete t h e upper trim and t h e rear vent.
3. Install the trim in the reverse order of removal, and note these items: - If the clips are damaged or stress-whitened, replace them with new ones.
- Push the clips, the hooks, and the tabs into place securely.
 Center Console Removal/Installation
NOTE:
- Put on gloves to protect your hands.
- Take care not to scratch the front seat, the dashboard,
or the related parts.
1 . Remove these items:
- Center console panel (see page 20-157)
...
 Center Console Armrest Replacement
Special Tools Required
KTC Trim Tool Set SOJATP2014*
* Available through the Honda Tool and
Equipment
Program; call 888-424-6857
NOTE:
- Take care not to scratch the console.
- Use the appro ...
See also:
Driving
...
If the Smart Entry Remote Batteryis Weak
If the beeper sounds, the indicator on the ENGINE START/STOP button flashes,
and the engine won’t start.
The To Start, Hold Remote Near Start Button message appears on the
multiinformation
...
Trim Removal/Installation - Trunk
Lid
Special Tools Required
KTC Trim Tool Set SOJATP2014*
*Available through the Honda Tool and
Equipment
Program; call 888-424-6857
NOTE:
- Put on gloves to protect your hands. .
- Take care not ...