 Honda Accord: Center Console Armrest Replacement
Special Tools Required
KTC Trim Tool Set SOJATP2014*
* Available through the Honda Tool and Equipment Program; call 888-424-6857
NOTE: - Take care not to scratch the console.
- Use the appropriate tool from the KTC trim tool set to avoid damage when removing components.
1. Remove the center console (see page 20-158).
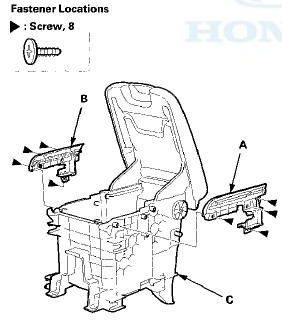
2. Remove the screws securing the driver's side panel (A) and the passenger's side panel (B) from the console box (C), and slide the driver's side panel and the passenger's side panel forward to release the ribs (D) of the panels from the hooks ( E l then remove the side panels.
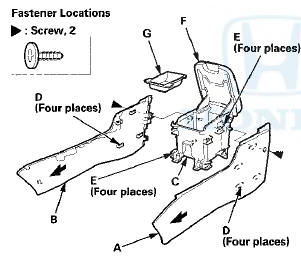
3. For some models: Open the console armrest (F), and remove the box tray (G) by pulling it up.
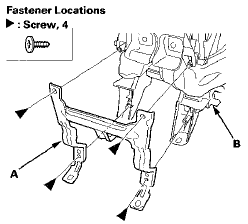
4. With rear ventilation: If necessary, remove the screws, then remove the console bracket (A) from behind the console box(B).
5. With rear ventilation: If necessary, remove the screws, then remove the left side duct (A) and the right side duct (B) from the console box (C).
6. With rear ventilation: Close the console armrest.
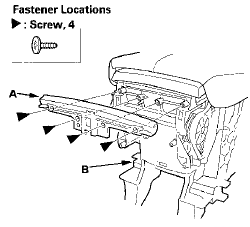
Remove the screws, then remove the box trim (A) from behind the console box (B).
7. With rear ventilation: Open the console armrest.
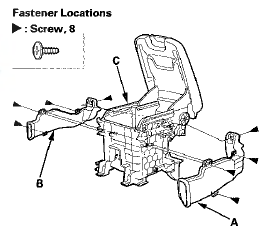
8. Remove the screws. Remove the left box rail (A) and the right box rail (B) by pulling them up from the console box (C).
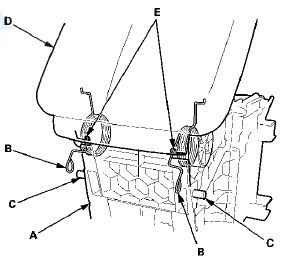
9. Remove the E-clips (A) and the hinge pin (B) from the console armrest (C) and the console box (D).
10. From both rear sides of the console box (A), release the opening springs (B) from the bosses (C) of the box, and close the console armrest (D). This rotates the opening springs into the notches (E) on the box.
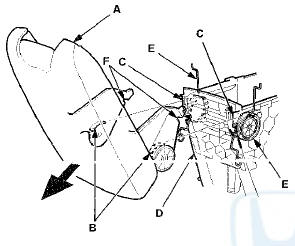
11. Open the console armrest (A). While passing the gear areas (B) of both sides through the notches (C) in the console box (D) and releasing the ends of the opening springs (E) from the notches (F), slide the armrest rearward, then remove it. Remove the opening springs from the console box.
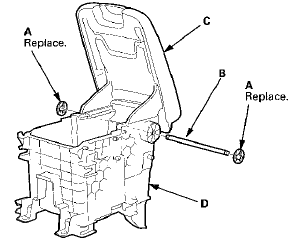
12. Install the armrest in the reverse order of removal, and note these items: - Replace the E-clips with new ones.
- Make sure the ribs of the driver's side panel and the passenger's side panel are engaged to the hooks of the console box securely.
 Center Console Rear Trim
Removal/Installation
Center Console Rear Trim
Removal/Installation
Special Tools Required
KTC Trim Tool Set SOJATP2014*
*Available through the Honda Tool and
Equipment
Program; call 888-424-6857
NOTE:
- Take care not to scratch the center console and the
rela ...
 Accessory Power Socket Trim
Removal/Installation
Accessory Power Socket Trim
Removal/Installation
Special Tools Required
KTC Trim Tool Set SOJATP2014*
*Available through the Honda Tool and
Equipment
Program; call 888-424-6857
NOTE:
- Take care not to scratch the console.
- Use the approp ...
See also:
Bearing Removal
Special Tools Required
•Attachment, 78x80 mm 07NAD-PX40100
-Driver Handle, 15 x 135L 07749-0010000
-Bearing Driver Attachment, 42 x 47 07746-0010300
1. Remove the idler gear shaft (see page 1 ...
Vehicle Identification Number
Manufacturer, Make, and Type of Vehicle
1HG: Honda of America Mfg., Inc.
Honda passenger vehicle
Line, Body, and Engine Type
CS1: Accord Coupe/K24Z3
Body Type and Transmission Type
1: 2-door ...
Driver's Outer Middle Pad
Removal/Installation
Special Tools Required
KTC Trim Tool Set SOJATP2014*
*Available through the Honda Tool and
Equipment
Program; call 888-424-6857
NOTE:
- Take care not to scratch the dashboard or the related
pa ...