
 Honda Accord: Lower Arm A Replacement
1. Raise and support the vehicle (see page 1-13).
2. Remove the rear wheel.
3. Remove the parking brake cable mounting bolt (B).
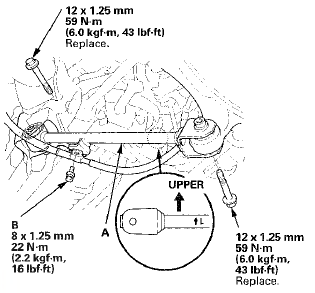
4. Remove the lower arm A mounting bolts, then remove lower arm A.
NOTE: Use new mounting bolts during reassembly.
5. Install lower arm A in the reverse order of removal, and note these items: - First install all of the components, and lightly tighten the bolts, then raise the suspension to load it with the vehicle's weight before fully tightening to the specified torque.
- Before installing the wheel, clean the mating surfaces on the brake disc and the inside of the wheel.
6. Check the wheel alignment, and adjust it if necessary (see page 18-5).
 Upper Arm Replacement
Special Tools Required
- Ball Joint Thread Protector, 14 mm 07AAE-SJAA100
* Ball Joint Remover, 32 mm 07MAC-SL0A102
1. Raise and support the vehicle (see page 1-13).
2. Remove the rear wheel.
...
 Control Arm Replacement
1. Raise and support the vehicle {see page 1-13).
2. Remove the rear wheel.
3. Remove the control arm mounting self-locking nut (A)
and the washer (B) from the knuckle side.
NOTE; Use a new ...
See also:
VSA Modulator-Control Unit Update
Special Tools Required
- Honda diagnostic system (HDS) tablet tester
- Honda interface module (HIM) and an iN workstation
with the latest HDS software version
- HDS pocket tester
- GNA-600 and an ...
TPMS (Tire Pressure Monitoring System)
Instead of directly measuring the pressure in each tire, the TPMS on this
vehicle
monitors and compares the rolling radius and rotational characteristics of each
wheel and tire while you are dri ...
Component Location Index
4-door with moonroof
2-door with moonroof
...