 Honda Accord: Center Console Removal/Installation
NOTE: - Put on gloves to protect your hands.
- Take care not to scratch the front seat, the dashboard, or the related parts.
1 . Remove these items: - Center console panel (see page 20-157) - Center console rear trim (see page 20-160) 2. If equipped, detach the harness clips (A) fastening the front seat heater switch harnesses (B) from the center console. M/T with seat heater: Detach the harness clip from the driver's side only.

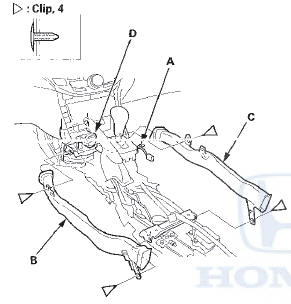
3 . D i s c o n n e c t t h e c o n s o l e a c c e s s o r y power s o c k et connector (A) and the auxiliary jack assembly connector (B), and detach the harness clip (C).
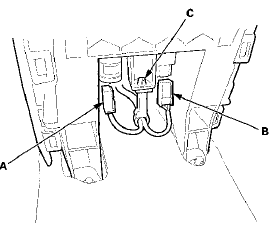
4. Remove the screws (A) and the bolts (B) securing the center console (C).
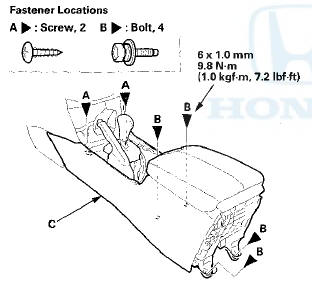
5. Remove the center console (A).
- 1 . Detach the clips by pulling out the front bottom edges of the center console from both sides.
-2. Pull up the console to release the hooks (B).
-3. With rear ventilation: Pull the console rearward to disconnect both the side ducts (C).
Without rear ventilation
With rear ventilation
6. With rear ventilation; If necessary, release the clips and detach the passenger's seat heater switch harness clip (A), then remove the driver's rear ventilation duct (B) and the passenger's rear ventilation duct (C) from the center rear ventilation duct joint (D).
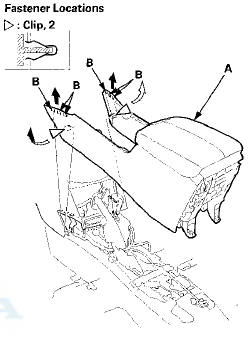
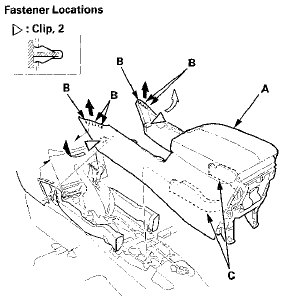
Fastener Locations
7. Install the console in the reverse order of removal, and note these items: - Make sure each connector is plugged in properly.
- If the clips are damaged, replace them with new ones.
- Push the clips and the hooks into place securely.
 Center Console Panel
Removal / Installation
Center Console Panel
Removal / Installation
Special Tools Required
KTC Trim Tool Set SOJATP2014*
*Available through the Honda Tool and
Equipment
Program; call 888-424-6857
NOTE;
- Put on gloves to protect your hands.
- Take care not t ...
 Center Console Rear Trim
Removal/Installation
Center Console Rear Trim
Removal/Installation
Special Tools Required
KTC Trim Tool Set SOJATP2014*
*Available through the Honda Tool and
Equipment
Program; call 888-424-6857
NOTE:
- Take care not to scratch the center console and the
rela ...
See also:
Ignition Key Light Test
1. Remove the steering column upper and lower covers
(see page 20-181).
2. Disconnect the 6P connector (A).
3. The LED should come on when power is connected to
terminal No. 6 and ground is co ...
Auto Door Locking/Unlocking
Your vehicle locks and unlocks all doors automatically when a certain
condition is
met.
• Auto Door Locking
• Drive lock mode
All doors lock when the vehicle’s speed reaches about 10 mph ...
Cam Chain Installation
Special Tools Required
Camshaft Lock Pin Set 07AAB-RWCA120
NOTE:
- Keep the cam chain away from magnetic fields.
- Before doing this procedure, check that the variable
valve timing control (VTC ...