 Honda Accord: A/C Condenser Fan High Speed Circuit
Troubleshooting
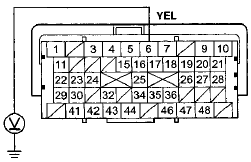
ECM/PCM CONNECTOR A (49P)

Terminal side of female terminals
Is there battery voltage? YES
-Go to step 6.
NO
-Repair an open in the wire between the under-hood fuse/relay box and the ECM/PCM. If the wire is OK, replace the under-hood fuse/relay box (see page 22-75).
6. Turn the ignition switch to LOCK (0).
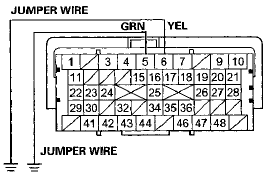
7. Connect ECM/PCM connector A (49P) terminals No. 5 and No. 6 to body ground with a jumper wire.
ECM/PCM CONNECTOR A (49P)

Terminal side of female terminals
8. Turn the ignition switch to ON (II).
Does the A/C condenser fan and radiator fan run on high? YES
-Check for loose wires or poor connections at ECM/PCM connector A (49P) terminals No. 5 and No.
6. If the connections are good, substitute a known-good ECM/PCM, and recheck. If the symptom/indication goes away, replace the original ECM/PCM (see page 11-204).
NO
-Replace the under-hood fuse/relay box (see page 22-75).
 Radiator and A/C Condenser Fan Low
Speed Circuit Troubleshooting
NOTE:
• Do not use this troubleshooting procedure
if the A/C
compressor is inoperative. Refer to the symptom
troubleshooting index.
• Before performing symptom troubleshooting, check ...
 A/C Compressor Clutch Circuit
Troubleshooting
NOTE:
• It is normal for the A/C compressor to turn off under
certain conditions, such as low idle, high engine
coolant temperature, hard acceleration, or high/low
refrigerant pressure.
в ...
See also:
Audio Remote Switch Test
1. Remove the steering wheel (see page 17-6).
2. Remove the audio remote switch (see page 17-7).
3. Measure the resistance between the terminals No. 1
and No. 8 in each switch position accordin ...
Additional Safety Precautions
Do not let a child wear a seat belt
across the neck. This could result
in serious neck injuries during a
crash.
Do not let a child put the shoulder
part of a seat belt behind the back
or un ...
Review of the 2023 Mercedes-Benz C300: Setting the Standard in Small Luxury Sedans?
In a market Mercedes-Benz maintains its commitment to its sedan lineup, extending from the prestigious S-Class to the more accessible C-Class. Despite its entry-level status within the range, the W2 ...
